Migrating Exchange on-premises mailboxes to Office 365
Exchange-to-Office-365-Migration-using-Cutover-Migration-Part-1
Exchange-to-Office-365-Migration-using-Cutover-Migration-Part-2
Exchange-to-Office-365-Migration-using-Cutover-Migration-Part-3
Exchange-to-Office-365-Migration-using-Cutover-Migration-Part-4
This is the main part of the on-premises Exchange to Office 365 migration series. This part is all about the essential steps of the cutover migration. Let us start the cutover migration:
- Verify the on-premises domain in your Office 365 organization –
- Sign in to Office 365 with administrative credentials.
- Go to Setup>Domains. Click Add Domain to add a new domain.
- Provide the domain name that you use for on-premises Exchange, and then click Next.
- Now, on Verify domain page, verify the entered domain either using Sign in to GoDaddy or Add a TXT record; then click Next.
- Follow the instructions of the DNS provider (usually, TXT record is needed to verify the ownership by DNS records. You need to wait for about 15 minutes after entering a TXT or MX record).
- In the Office 365 domain wizard, choose done, verify now, and you’ll see a verification page. Choose Finish.
- Connect Office 365 to your email system –
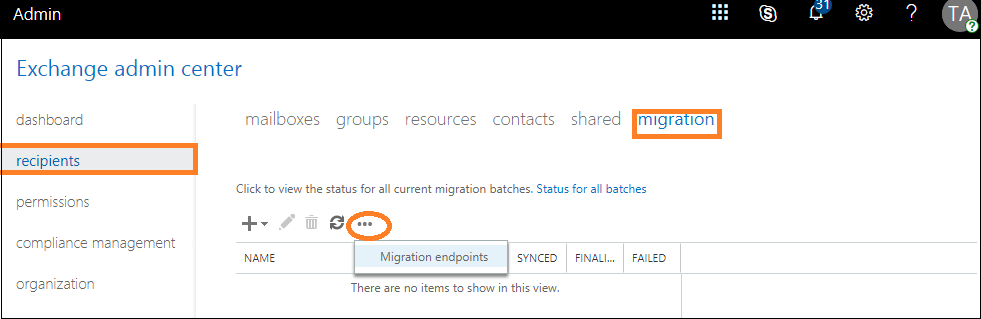
- Open Exchange Admin Center in Office 365. Go to Recipients>Migration. From More…, select Migration endpoints.
- At this opened page, select New +.
- On the Select the migration endpoint type page, choose Outlook Anywhere and click Next.
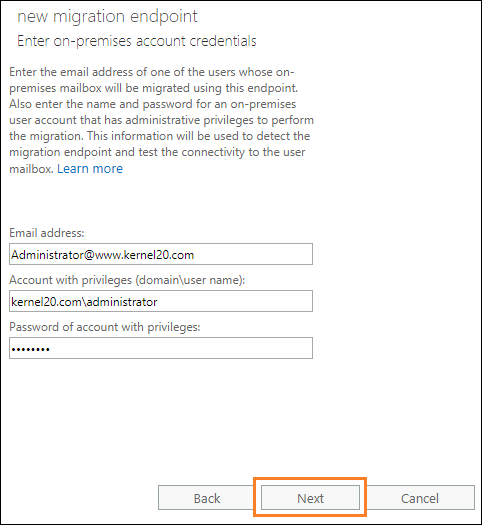
- Now enter the email address of any user in the on-premises Exchange organization (for testing purposes). Also, provide a username and password of an account with necessary administrative permissions in the on-premises organization. Click Next.
- After the successful Office 365 connection, the connection settings are displayed. Click Next to continue.
- On the Enter general information page, enter the Migration end-point name. Finally, click New to create the migration endpoint.
- Creating a cut-over migration batch
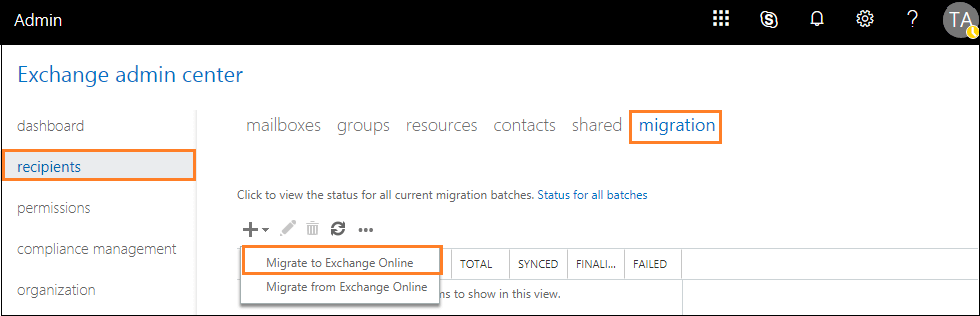
- Open Exchange Admin Center. Go to recipients>migration. Select New +>Migrate to Exchange Online.
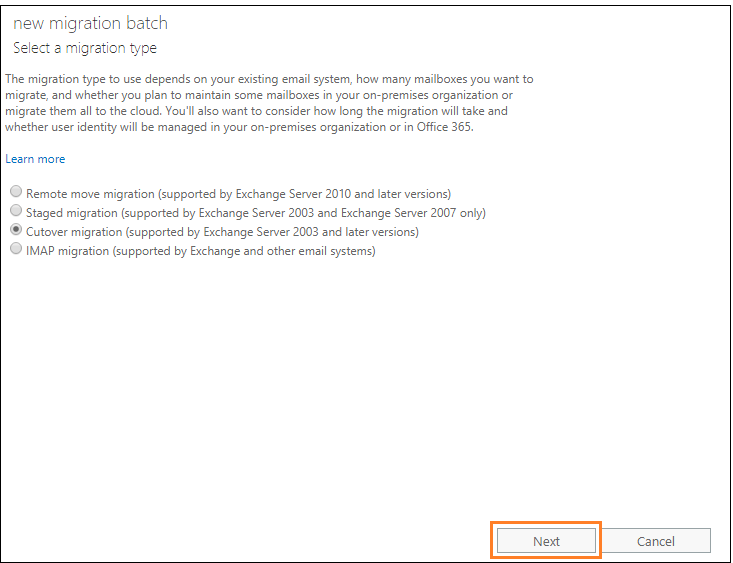
- On the Select a migration type page, select Cutover migration and then click Next.
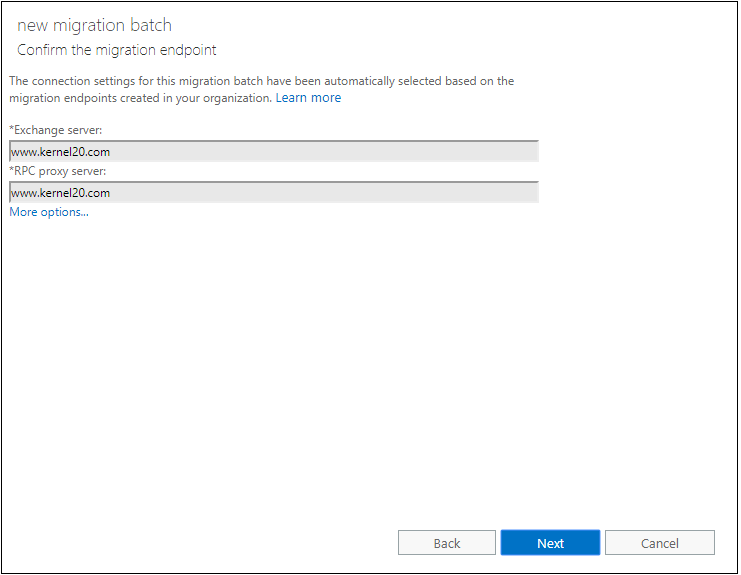
- On the Confirm migration end-point page, confirm the displayed connection settings information about the migration endpoint. Click Next.
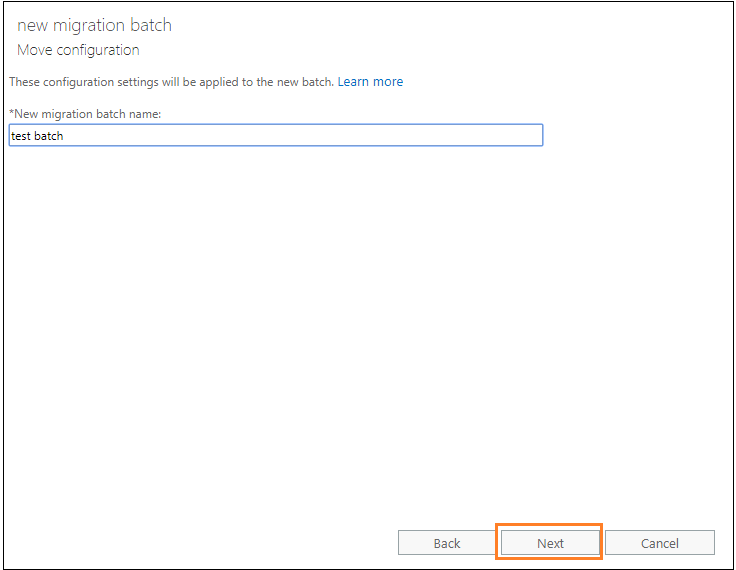
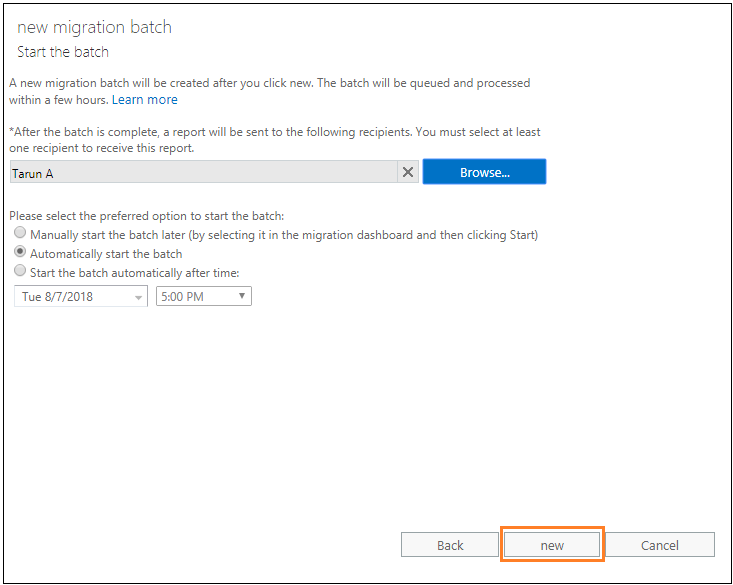
- Enter the migration batch name. Click Next.
- Now, select either Automatically start the batch (begins as soon as you click) or Manually start the batch later (status is set to start later) according to your convenience. Finally, click New to create the migration batch.
- Starting the cut-over migration batch
- Change the DNS records
- In Exchange admin center, go to Setup > Domains on the left sidebar.
- Now choose the domain for verification.
- Now, choose Start setup on the Setup page.
- Then click Verify on the Verify domain page.
- Delete the cutover migration batch –
In a cutover migration, the SMTP address of each on-premises mailbox is required to create an email address for the new Office 365 mailbox. For this, your on-premises domain must be verified in Office 365. Follow these steps one-by-one to do this:
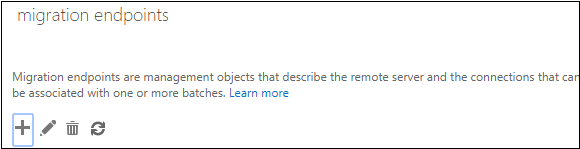
Here, you need to create a migration endpoint. This helps in the connection between Exchange on-premises and Office 365 email system. Create it as described below:

To create a cut-over migration batch, perform these steps:
If you chose the second option, Manually start the batch later, go to Recipients>Migration. On the migration dashboard, select the batch created and then click Start. The status of the migration batch changes to Syncing, i.e., migration is in process.
The synchronization is working if users get created in Office 365 admin center as the migration proceeds. On completion of the migration, the Syncing status is changed to Synced.
Now, you need to point your DNS (MX) records to Office 365. This is to ensure emails are delivered to your Office 365 mailboxes. To change DNS record:
It will need up to 3 days for the change of DNS records. So, continue to the next after three days only.
After ensuring that the MX record is changed and all the mailbox data is migrated, you need to delete the cutover migration batch.
For deleting the migration batch, open Exchange Admin Center, go to Recipients>Migration. Select your migration batch from the list and then click Delete.
After the completion of migration, you can assign licenses to all Office 365 user accounts. Also, there are certain post-migration processes (explained in 3rd part of the cut-over migration series) which are required in cutover migration for smooth access of mailboxes data. Read 3rd part of the series to get information about the processes required to be executed after the migration.
Conclusion
Exchange administrators can migrate user mailboxes to Office 365 using a cutover migration. The steps are provided in this article in brief only.
FAQs
Q. What is the significance of migration endpoints in the Cutover migration?
A. Migration endpoints are basically connection descriptions that can be used to perform Exchange to Office 365 Cutover migration.
Q. What are the other native migration options available on the Exchange Admin Center?
A. The native Office 365 migration solutions in the Exchange Admin Center are:
- Remote move migration (Exchange 2010 and later versions)
- Staged migration (Exchange Server 2003 and 2007 versions only)
- Cutover migration (Exchange 2003 and later versions)
- IMAP migration (Exchange and other email systems)
Q. What do we need to confirm the migration endpoint in the cutover migration?
A. Users or administrators are required to provide Exchange Server and RPC proxy server domain names to confirm the migration endpoint.
Q. What are the account requirements in the advanced tool for migrating Exchange Server to Office 365 platform?
A. The tool requires only Exchange Server login account details – server name, username, and password while only username and password for the Office 365 account.