
When the Exchange Administrator starts the Server, it starts quickly like a standard computer system, and the databases present in it are shown in the list. Then the user account associated with the Server also accesses their mailboxes saved in the database. But a dirty shutdown ensures that the database will be dismounted from the Server. It is a safekeeping method that makes sure that the database is not affected by the dirty shutdown.
Usually, large organizations never turn off their Exchange Servers to avoid any kind of interruption in database management. Whereas, smaller organizations discontinue the ongoing Server activities at the end of the day and restart them again the next day, which causes dirty shutdown sate and dismounted database issue.
When the Exchange database cannot be mounted, any of the following error messages may appear:
- Failed to mount database ‘Mailbox Database’ hr=0x80004005, ec=-528
- Failed to mount database ‘Mailbox Database’ hr=0x80004005, ec=-530
- Exchange is unable to mount the database that you specified. Specified database: d1cdba46-6f79-46f2-ba14-3ae2fa8aad43; Error code: MapiExceptionCallFailed: Unable to mount database. (hr=0x80004005,ec=-2147467259)

Why is Exchange database shown in dirty shutdown state?
When the Exchange database cannot be mounted it is shown in dirty shut down state. One or more of these can be the reason:
- EDB became inaccessible
- Log files got damaged
- Log files got removed
- Miscellaneous other reasons
You cannot guarantee that Exchange Servers will never fail, but as an IT manager you should always be ready to rise to the occasion and do your best to disentangle the mess. In this blog I am going to share with you a little secret on how you can do it in surprisingly easy way.
When the Exchange database is not mounting, the way of recovery depends on the status quo, for example, you may have a good backup and good log files, there may be no backup at all or backup is corrupt but log files are fine, along with backup log files that are also corrupt. In most of these situations, using Exchange Server’s native recovery tool – eseutil, you can solve the problem, however, if the problem is not solved you can use Exchange Server Recovery software to solve the problem. Here is how you do it:
![]()
Make sure that the Exchange Server is working in flow.
- Step 1: Locate the problem area – the folder on the Exchange Server in which the Exchange database file and log files are stored. Generally, the folder is located here:
C:\Program files\Microsoft\Exchange Server\v15\Mailbox\ Mailbox Database\*.edb
However, the location may vary if you have chosen some other place to store the log files. Generate a backup of the Exchange database and associated log files. - Step 2: Stop the Exchange services and close the Exchange Server management console or ECP.
- Step 3: Now rename the Mailbox database folder. For example, you can rename it to _old. If the folder containing the log files is different than the Mailbox Folder, rename that as well.
- Step 4: Create a new folder with the name of the folder that you have just renamed. In the below image, old database folder is ‘
Mailbox Database 0054972546_old’ and the new folder is ‘Mailbox Database 0054972546’.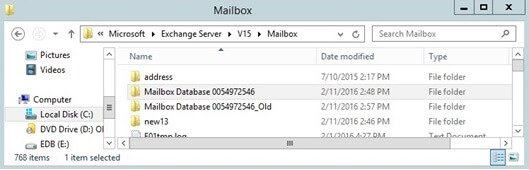
- Step 5: Start the Exchange services and open the Exchange Server Management console.
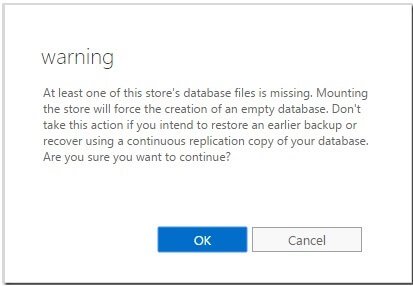
- Step 6: Now right click on the Database folder in the Exchange Server management console and click mount. It will ask to create a new, empty database. Click OK.But before that, you can ask the users to copy the existing, old data from the email clients, because on mounting the new, empty database, data on the email clients will be refreshed and disappear. Or, you can ask the users to configure a new profile in the email client. In this way a backup copy of data will be saved. However, as you have already created a backup of the EDB file, this step is only for extra precaution.
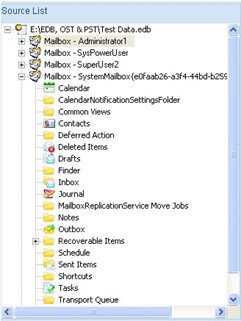
After this step, the exchange will start running and all the mailboxes will become accessible but will be empty. Now when you open the folder, you will find the new, empty Exchange Server database inside it. Now comes the important part – restoring data from old, corrupt database to the empty mailboxes. - Step 7: Install and launch the application (Exchange Server Recovery). Locate the old, corrupt database which must be in the renamed folder (as we did in step 3).Include the required database in the application. Data will be recovered and displayed in an Outlook like GUI. In the following image, recovered data from the old Exchange Database File is seen with all the mailboxes in it, and the last mailbox is expanded to show all the folders in it.
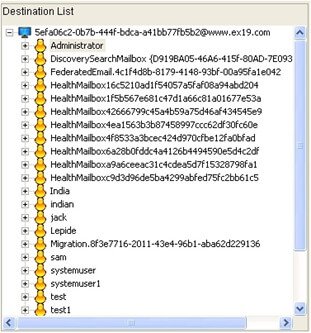
- Step 8: Add the Live Exchange Server to the application. You will be able to see the new, empty EDB after the Exchange Server is added to the application. In the following image, the EDB can be seen at the root and the mailboxes are under it which are empty.
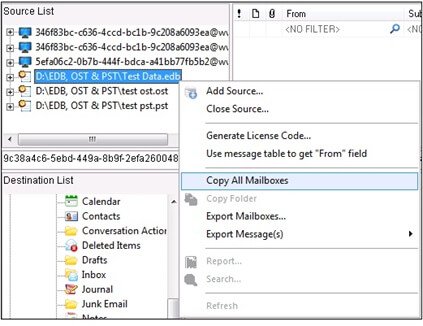
- Step 9: Right-click on the old EDB in the source pane and select ‘Copy All Mailboxes’ option from the context menu.
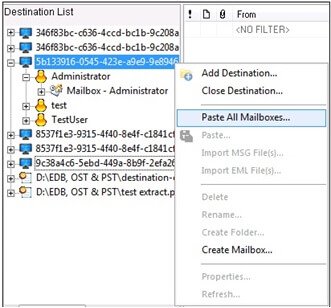
- Step 10: Right click on the Live Exchange Server in the destination pane and select ‘Paste All Mailboxes…’ option.
After that ‘Migrate all mailboxes’ wizard will start. You will get the option to select which mailboxes you want to migrate and what data you want to migrate based on date. - Step 11: Source mailboxes will be automatically mapped folder wise to the destination mailboxes. If a match is not found, you can map the source mailbox to any other existing target mailbox.

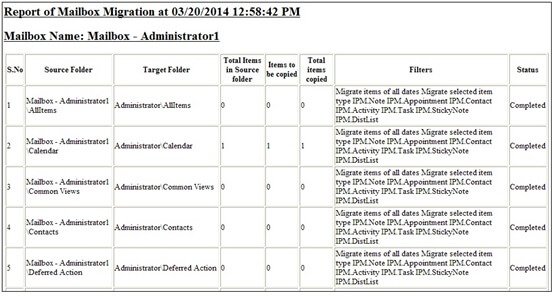
- Step 12: Once the mapping is complete, begin the migration by clicking on the start button. As the migration progresses, you will see its status on the application’s console. Finally, after all the mailboxes are migrated, you can see its report by clicking the ‘Generate Reports’ button. In the following image, the report is shown in a grid.
After this, users will be able to see their emails in the Outlook client, and normal email services will be restored.
Conclusion
The cmdlets to mount the database back to Exchange Serve do not assure that it will safely complete the process. Exchange Server Recovery software will restore the Exchange database to the Server with all the mailboxes and the data present. The software does not require any backup, log file, or transaction log to recover the items. As convert EDB to PST tool did for Mr Krish.
![]()
