
This is the second part of a series of blogs detailing how to migrate from Exchange Server 2013 to 2016. In part one, we discussed system requirements, prepared the environment for installation, and installed Exchange 2016 into the existing Exchange 2013 environment. We also looked at configuring the Service Connection Point (SCP). In this part, we will discuss installing the correct SSL certificate on Exchange 2016 and briefly talk about migrating the CAS role from the existing Exchange Server 2013 to 2016.
To read other parts in this series, go to:
Exchange 2013 to Exchange 2016 Migration (Part 1)
Exchange 2013 to Exchange 2016 Migration (Part 3)
Exchange 2013 to Exchange 2016 Migration (Part 4)
Exchange 2013 to Exchange 2016 Migration (Part 5)
Exchange 2013 to Exchange 2016 Migration (Part 6)
Exchange 2013 to Exchange 2016 Migration (Part 7)
Instant Solution - Exchange Migrator
Exchange/Office 365 migrations are quite easy with professional tools like Exchange Migrator. This tool helps to manage mailbox and public folder migrations involving different Exchange versions and deployment types. Also, this tool helps with all tasks starting from the pre-migration analysis to the preparation of reports after the migration.
Installing the right SSL certificate on Exchange 2016
Installing the Exchange Server creates a self-signed certificate that includes the FQDN and hostname of the server. Clients do not trust this default certificate, and therefore a hostname is used for establishing external connections to prevent the internal server from being exposed to the internet. Add a new certificate allotted by a CA which the clients can trust.
To migrate the Client Access Server (CAS) role to Exchange 2016, you will need to change ‘X’ records that are being used for the old Exchange server to Exchange 2016. This will ensure that Exchange 2016 uses the same ‘X’ records and, therefore, the same certificate as Exchange 2013. In our case, the certificate that was on our Exchange 2013 can be used as it had the correct names, and the clients trust it.
Follow the below mentioned steps to install an SSL certificate on Exchange 2016.
- Identify the required SSL certificates on the Exchange 2013 server that has the required names used for client connections both internally and externally, with a valid expiry date, and used for the IIS. In order to this, execute the following command in the EMS on the Exchange 2013 CAS server:
Get-ExchangeCertificate | fl Thumbprint, NotAfter, Issuer, CertificateDomains, Services
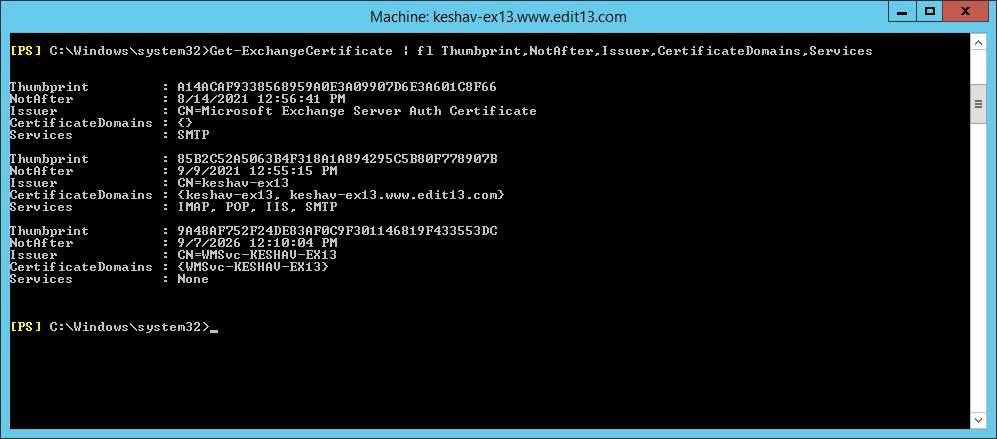
The output of this command will give you a thumbprint. Take note of that certificate thumbprint as you will require it in the next step. - The next task is to export the certificate from the old Exchange Server to the Exchange Server 2016. For exporting both the public and private keys for the certificate that we identified in the above step, use the ‘Export-ExchangeCertificate’ cmdlet. A password (I will specify ‘Password’) has to be set up on the exported certificate because it has a private key.
Run the following command on the same Exchange 2013 CAS server:$password = ConvertTo-SecureString “Password” -AsPlainText –Force
Export-ExchangeCertificate -Thumbprint 85B2C52A5063B4F318A1A894295C5B80F778907B -FileName
C:\Exchange13Certificate.pfx -Password $password | Out-NullThis will create a file by the name of ‘Exchange13Certificate.pfx’ on your Exchange 2013 CAS server.

- In this step, the Exchange Server 2013 certificate will be imported to the Exchange 2016 CAS server. This has to be done for each CAS server if you have more than one CAS server. Copy the Exchange13Certificate.pfx file to the C drive of your Exchange 2016 server.Run the following command in the Exchange Server 2016’s Exchange Management Shell for importing the certificate in the Exchange and assigning the essential services, and press ‘n’ when asked to overwrite the present SMTP certificate:
$password = ConvertTo-SecureString “Password” -AsPlainText –Force
Import-ExchangeCertificate -FileName C:\ Exchange13Certificate.pfx -PrivateKeyExportable $true –Password
$password | Enable-ExchangeCertificate –Services POP,IMAP, IIS,SMTP –DoNotRequireSsl
Conclusion
So far we have taken you through the process of installing Exchange 2016, obtaining the right SSL certificate on the server and migrating the CAS role over to 2016. In the next blog (part 3) we will discuss how to configure virtual directories settings and outlook anywhere settings on the new server.
FAQ
Q. How does FQDN work in security certificates?
A. The FQDN file contains the Fully Qualified Domain Name that you want to use for your Exchange Server. It ensures that your domain name is legitimate and ready to use.
Q. What does SSL Certificate perform in Exchange Server?
A. When you are adopting a new Exchange Server, the SSL certificate encrypts the connection. It authenticates your Exchange Server and assures the client system that it is not communicating with a bot or imposter.
Q. Does the Exchange Migrator follow the encryption of the message?
A. Yes, the software maintains the encryption used by the SSL certificate while migrating the mailboxes.
Q. Can I skip installing the SSL Certificate while adding a new Exchange Server?
A. SSL Certificate is essential for correct recognition of mailboxes present in the database that you will create in Exchange. Also, the communication will be more secure.
Q. Should I purchase a new SSL certificate?
A. No, the above method allows you to migrate your SSL certificate from Exchange Server 2013 to 2016, and you should use it.
