When you’re using Gmail for email communication, the good thing is that it doesn’t require any additional resources (like third-party software) to export or backup your mailbox data. All your messages and items in the Gmail mailbox can be downloaded via POP and IMAP. It’s easy to backup, export, and import your data—all you need is to sign in to your account and create an archive.
MBOX uses a single text file format to store its emails (in concentrated format—each message is saved one after the other). Also, MBOX is a free, open-source format supported by man email clients like Thunderbird, Apple Mail, Eudora, and many others. And Gmail allows users to backup their mailbox data in MBOX format. They can restore this MBOX backup file to Gmail when there is a need.

Try automated tool MBOX to PST Converter to restore MBOX file to Gmail, PST, DBX, MSG, EML, PDF, MHTML, and Exchange Server.
![]()
Here are the steps to export Gmail data to MBOX and restore MBOX data to Gmail:
Module I: Export Gmail data to MBOX file
Here’s how you can export your Gmail items in MBOX format.
Steps to download the copy of your Gmail mailbox in MBOX format
- To download, select message(s), launch your Google Mail by setting a label. For example, select “messages to download” to download only the message(s) that are important to you.
- Go to https://takeout.google.com/settings/takeout
- Select “Select None”
Note: Thunderbird can save only emails, as it cannot hold other data. - Scroll down to “Mail“, and select the gray X to the right
- To download only selected messages, click “All Mail.“
- Check “Select Labels.”
- Verify the labels that you want to download.
- Hit “Next.“
- Do not alter the file type; select “Create Archive.”
- The zip file is sent through your chosen delivery method. The default method sends the zip via email containing the download link. However, the download may not be instant, as it depends upon the size of the emails you are downloading— the heavier the file is, the longer it will take to create your archive.
Module II: Restore MBOX Emails to Gmail
To import your backed-up Gmail items (MBOX file) into the Gmail mailbox, you have to use additional resources like the Thunderbird application and an add-on.
Use the following instructions to import all emails from the MBOX file to your Gmail mailbox.
Phase I: Configure Your Gmail Account in Thunderbird.
- Download and install the Thunderbird program.
- Start Thunderbird program and select Create a new account: Email.
- Choose “Skip this and use my existing email” option to proceed.
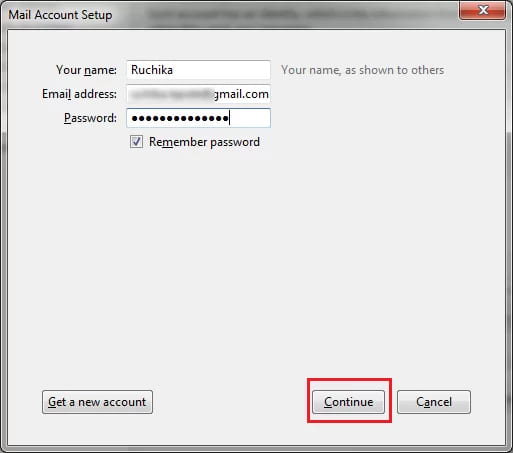
- Provide your valid credentials like name, Gmail email address, and Gmail password, and select “Continue.”
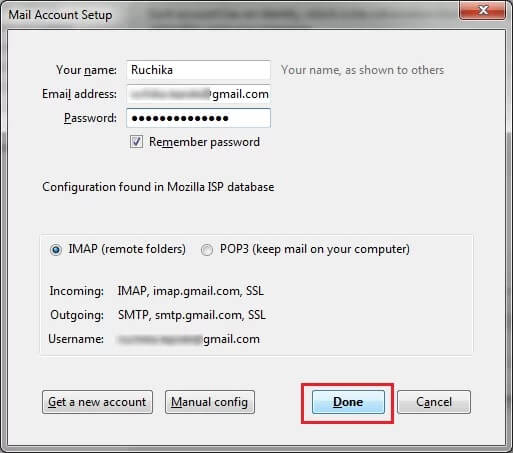
- Ensure IMAP is selected, and then hit “Done” to save settings. Thunderbird automatically restore settings if using Gmail.
- Your Gmail account is displayed on the left side of the screen, and you can view all your emails.
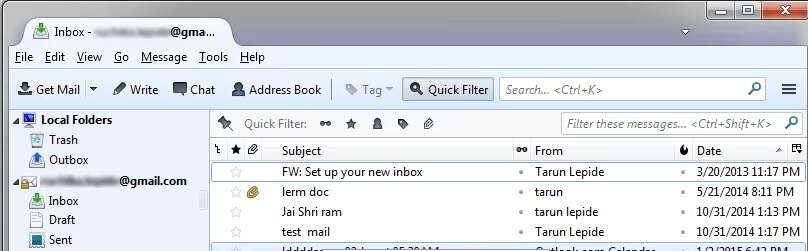
Thunderbird is now fully setup with your Gmail account
Phase II : Download a Thunderbird Extension – ImportExportTools
- Use this link: to https://addons.thunderbird.net/en-us/thunderbird/addon/importexporttools/ to download Thunderbird add-on “ImportExportTools” on your machine.
- Before clicking the “Download Now” button, ensure that the extension supports MBOX files. Store the extension file at the same location where you stored the .xpi file.
- Launch Thunderbird program.
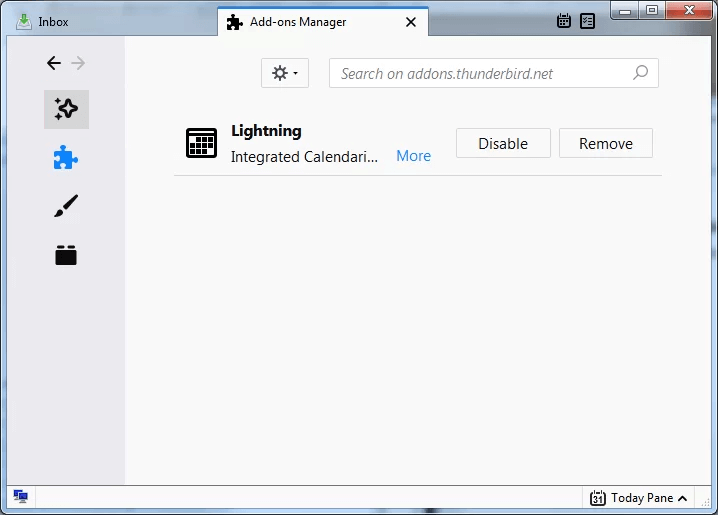
- Go to the Menu and click “Add-Ons.“
- When the Add-ons Manager tab opens, reach the gear icon, and click the icon for “Install Add-on From File.“
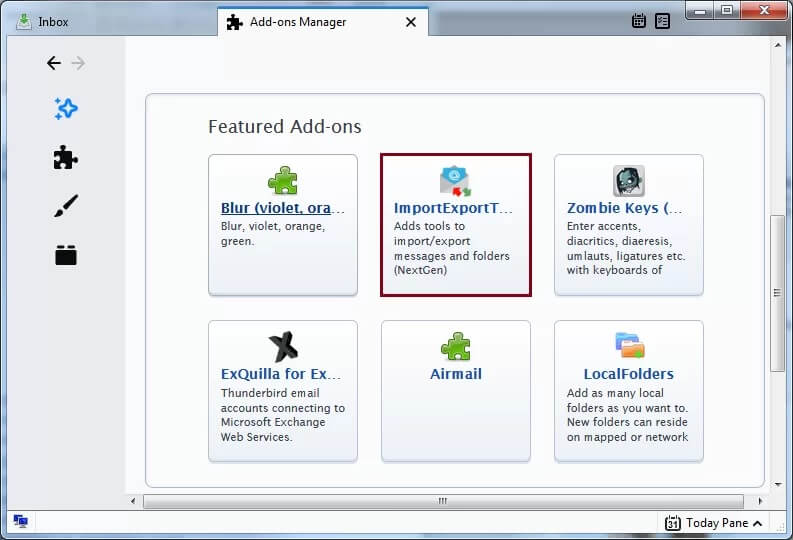
Note: Alternately, click the Browse all add-ons button and search for the ImportExportTools add-on. - Provide the .xpi file location and follow the download instructions precisely.
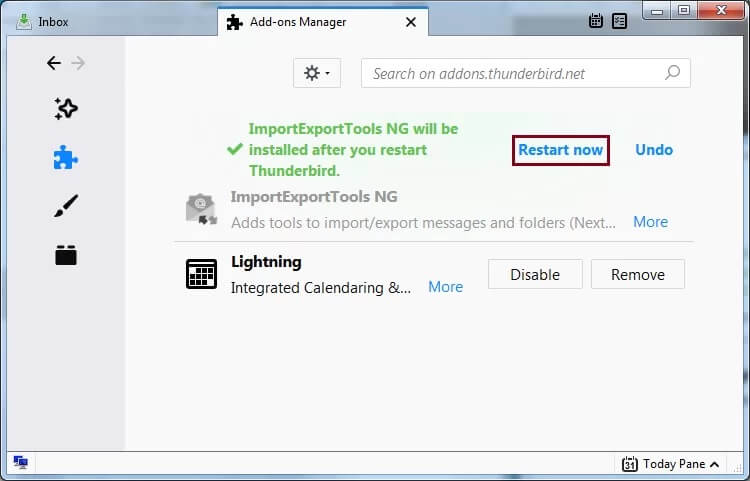
- Restart the Thunderbird program.
Phase III: Import MBOX File Emails, Label it Before the Export
- Launch Thunderbird application.
- On the navigation pane, right-mouse to select “Local Folders.” Now import the MBOX file to a local folder. Click ImportExportTools, and then select Import MBOX file.
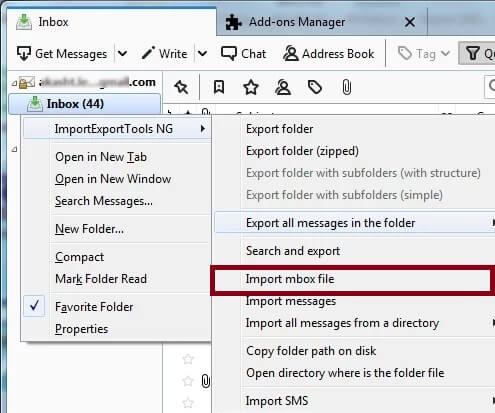
- From the option, select “Import directly one or more MBOX files” and click ‘OK.‘
- Browse the folder location where you extracted the MBOX files. Choose the MBOX file you have labeled and want to import (as shown in Module I). Click ‘Open‘ to proceed.
- All emails will now start importing to the user-defined location.
Phase IV: Import Emails to Gmail Account
- Launch Thunderbird application.
- In the navigation pane, expand “Local Folders“. Now select the corresponding labelled folder that you want to import in Gmail.
- Select all emails in the folder, right-click the mouse and select ‘Copy to – – ‘.
Note: gmail_account = email address of Gmail account, and label_name = the path to the label folder that you wish to import in Gmail. - All emails will import to the labeled folder that you have selected. Importing may take some time to upload all MBOX emails to your Gmail Account.
Alternate Solution to Save MBOX Files in Gmail
MBOX to PST Converter is the most recommended alternative for the conversion of MBOX files to PST format. PST, as we know, is the default file format of Outlook. Conversion of your MBOX file in PST format allows you to access your mailbox data in the Outlook email client. Moreover, the tool facilitates easy migration of MBOX files to other popular formats like EML, DBX, MSG, Office 365, Gmail, and Exchange Server. For those who are new to the software, this is how the tool works:
-
- Launch MBOX to PST converter on your Windows machine.
![]()
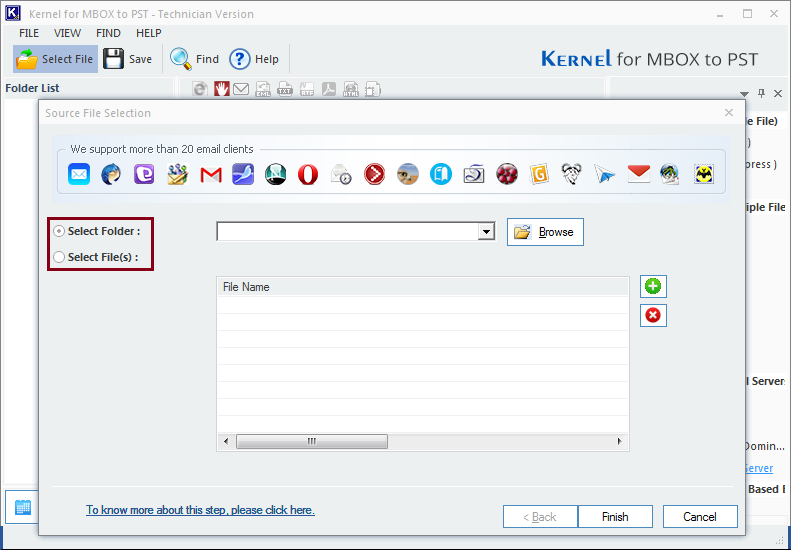
- Select the mode to add files to the tool’s interface. To import an entire folder consisting of MBOX files, click the Select Folder radio button. In case you want to add individual MBOX files, click the Select File(s) radio button. Select the appropriate mode to add files and move further in the process.
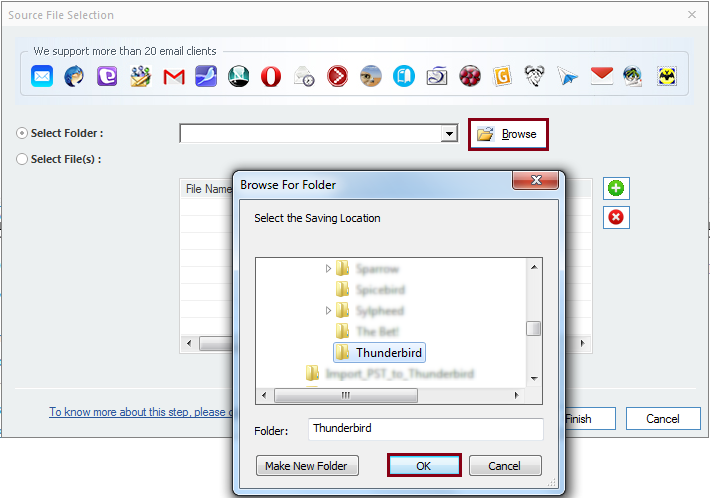
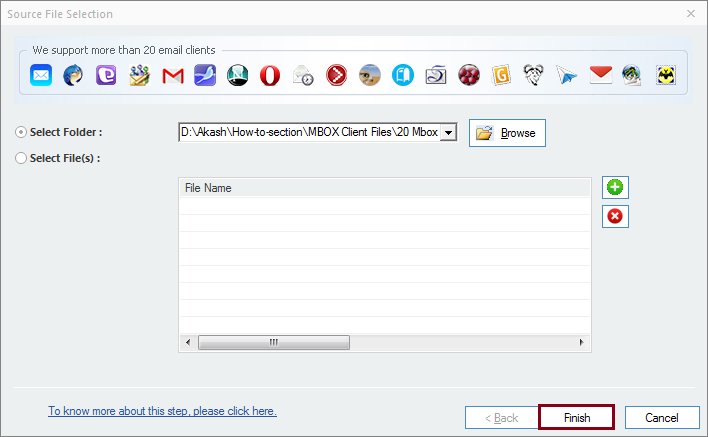
- Click Browse to navigate to the folder containing the MBOX files, select the folder and click OK.
- Then, click Finish.
- Once you click the Finish button, you can preview the contents of each mail by simply selecting the mails. Now, to save the required file, click the Save button located at the top left corner of the interface. You can also opt. to the Saving Options located.

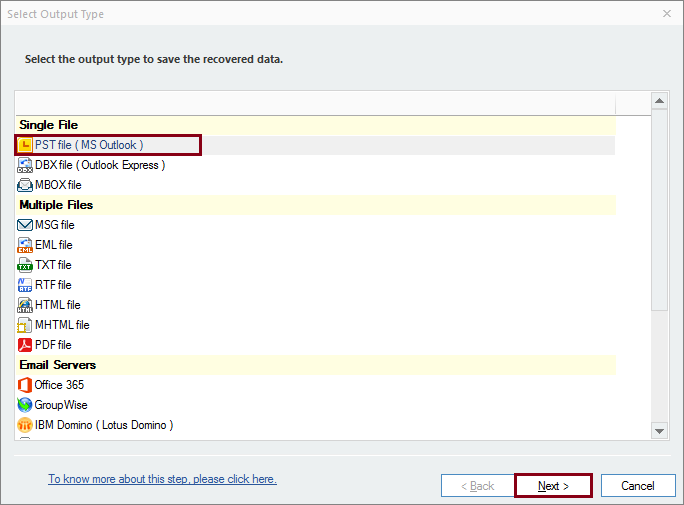
- Within the Saving Options window, select PST (MS Outlook) as the output type and click Next.
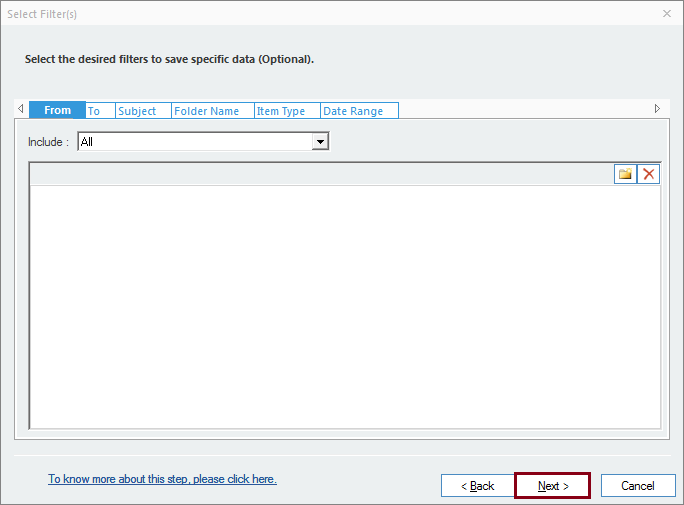
- Select the appropriate filters to save specific data from your file. Click Next, if you don’t want to make any changes to the converted PST.
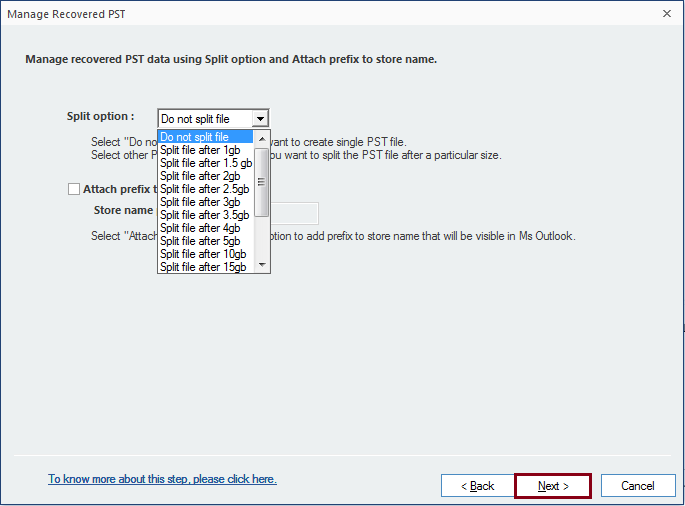
- The next window allows you to split your file. Under the Manage Recovered PST window, you can choose to split the file as per your own preferences. However, if you do not feel the need to do so, simply click Next to move further in the process.
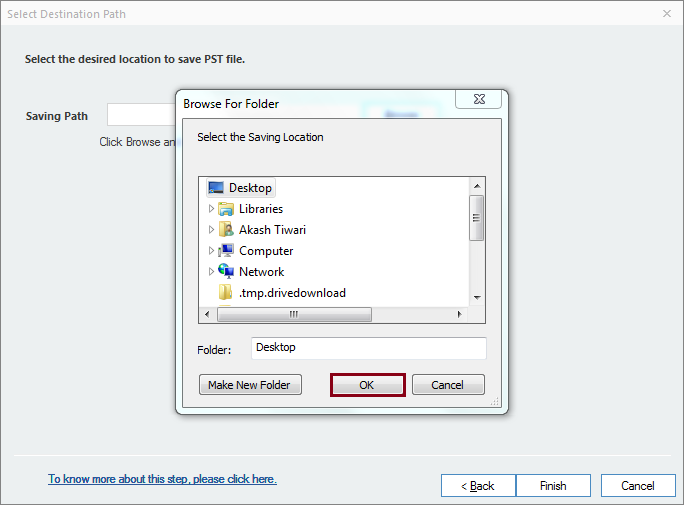
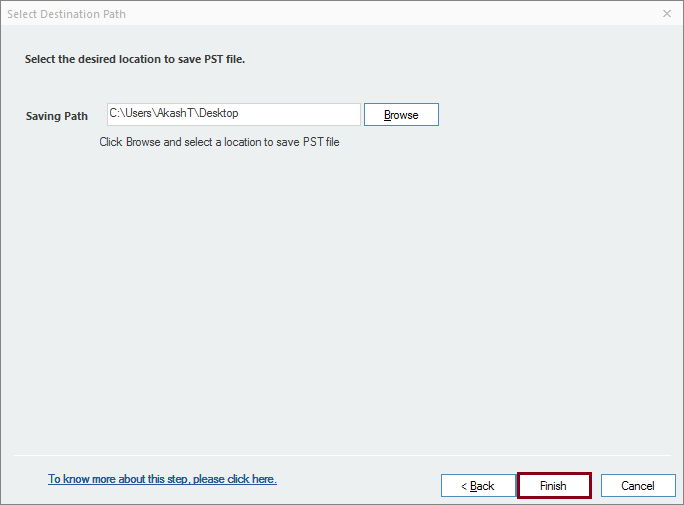
- Now, browse to provide a destination path to save the converted file. Select the path and click OK.
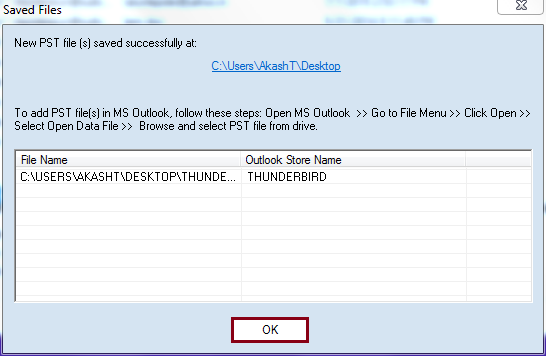
- Finally, click Finish to execute the conversion task.
- The converted PST gets saved to the specified location. Click OK to finish the conversion task.
![]()
Conclusion
MBOX to PST is the only platform where you can convert the MBOX files to other formats in the least time. It can select MBOX files from multiple MBOX-based clients, and you can apply the available filters and choose only the necessary content. After the conversion, the software shows the link where it has saved the converted file and can directly access it.