Sometimes Outlook hyperlinks stop working suddenly and you keep on clicking the link only to get some error messages. This issue is noticed in almost all versions of Outlook.
The error messages displayed by Outlook on clicking broken hyperlinks are different in different versions of Outlook.
- Error message in Outlook 2016 /2013
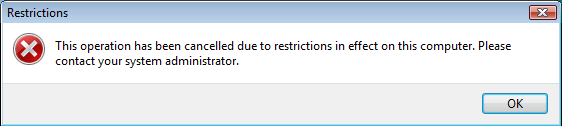
- Error message in Outlook 2010/2007
“Your organization’s policies are preventing us from completing this action for you. For more info, please contact your help desk.”

“This operation has been canceled due to restrictions in effect on this computer. Please contact your system administrator.”
What is the reason behind the hyperlink issues?
Hyperlink issues are noticed mostly after the installation of Windows updates, browsers, add-ons or plugins, registry cleaners, etc. Some policies enforced by organizations can also be a reason for hyperlink issues.
Important: The global settings of Microsoft disable hyperlinks by default for email items that are classified as Junk. One can find settings under HOME >> JUNK >> Junk E-Mail Options. Such settings are for protecting users from phishing attacks.
Methods to Solve the Hyperlink Issues in Outlook
Many ways can be used to fix the hyperlink issues. Let’s start with the different ways solve hyperlink issues in different Outlook versions like MS Outlook 2016, 2013, 2010, 2007 or 2003.
Method 1: Install and Use Microsoft Easy Fix Automatically
Simply, fix the problem with the automated tool offered by Microsoft. After downloading the tool, install and launch the wizard and follow the very simple steps.
It will start to fix broken hyperlinks automatically. The wizard works for English and other language versions of Windows.
Please Note: The wizard works successfully for Windows 7, Windows Vista, Windows XP, Windows Server 2008 and Windows Server 2003
Method 2: Set IE (Internet Explorer) and MS Outlook as default programs
Follow the steps for Internet Explorer 11 and 10 version
Step 1: Start Internet Explorer and select Tools >> Internet Options
Step 2: Choose Advanced >> Reset.
Step 3: From the Reset Internet Explorer Settings, select the checkbox Delete personal settings and click the Reset button.
Step 4: Restart Internet Explorer and select Tools >> Internet Options >> Programs >> Set Programs
Step 5: Choose Set your to default programs; then under Programs list, select MS Outlook and click Set this program as default.
Step 6: Now, finally, scroll back to the top, select Internet Explorer and select Set this program as default.
Step 7: Click OK and close the Default Programs window.
Method 3: Use Registry Key from Another Machine
It is advised to use the steps correctly and as instructed; also take a full back up of the registry so that registry values can be restored successfully just in case of any problem or sudden issues. Follow the steps as mentioned below:
- Export registry key from another computer
- Import the registry key:
- On Windows 10, Windows 8.1 and Windows 8
- On Windows 7
Step 1: Click Start or click the Windows icon and type Run.
Step 2: Type regedit in the Run window and click OK.
Step 3: Click following registry subkey
HKEY_LOCAL_MACHINE\Software\Classes\htmlfile\shell\open\command
Step 4: Click File or Registry menu (depends on OS version) from the Registry Editor window and select Export.
Step 5: Provide name and location to save the file on your local machine.
Step 6: Exit the Registry Editor and file export is done.
Step 1: First copy the exported registry key file to the desktop of the affected machine and double-click the .reg file. You may see any of the following message:
“Adding information can unintentionally change or delete values and cause components to stop working correctly. If you do not trust the source of this information in C: Users\
“Are you sure you want to add the information in drive: location file was copied to\file name.reg to the registry?”
Step 2: Click Yes and OK.
Step 3: Now, verify the values of a string of “HKEY_CLASSES_ROOT \.html” key is “htmlfile.”
Step 4: Click the Windows + R button, type regedit and click OK.
Step 5: Click on “HKEY_CLASSES_ROOT \.html”
Step 6: Finally, check the string value and make sure it is “htmlfile”. If it is not, then modify it (by right-clicking typing htmlfile in value filed), click OK to finish.
Conclusion
We hope that the above-mentioned methods work for you. Just in case if none of these methods work, then we recommend a third-party tool to repair Outlook PST file. We highly recommend Outlook PST Repair as this Outlook PST recovery tool is highly proficient and is used by IT experts for PST related issues.
![]()