When user performs specific action or open certain file, the system crashes or programs freeze. It could also happen that user computer is noticeably slower or programs “hang” when user accesses certain files. This problem might occur because there are errors on hard disk drive.
The user can troubleshoot the problem by using the Disk Check tool in Windows 7. Disk Check can identify and automatically correct file system errors and it makes sure that user can continue to load and write data from the hard disk. The user can use Disk Check in Windows 7 not only for local hard drives, but also for removable media such as USB memory sticks or memory cards.
CHKDSK (“Check Disk”) is a system tool in DOS, OS/2 and Windows, where it verifies the file system integrity of a volume and fixes logical file system errors. It is similar to the fsck command in UNIX.
Running CHKDSK
To successfully run the CHKDSK to eliminate the error that has been encountered, there are certain steps that need to be followed:
1. To initiate the process, click the Start Windows icon.
2. In the shortcut menu, click Open Windows Explorer.
3. In the navigation pane, click on Computer. Here the local drives appear in the right pane.
4. Click on the drive that you want to check.
5. Click Properties.
6. Click the Tools tab.
7. Click the Check now button.
8. In the Check Disk window, you have to select the Automatically fix file system errors check box.
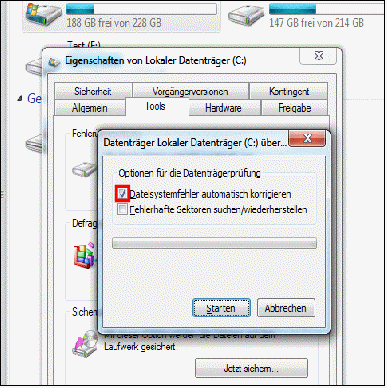
9. Click Start.
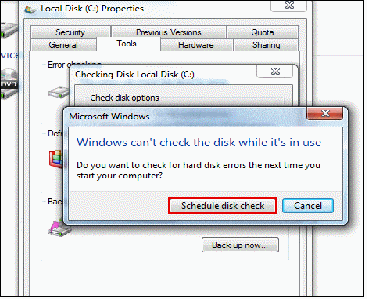
10. If the system drive is currently in use, then a dialog box with a warning message appears. In such case, click Schedule disk check.
11. Exit all open programs, and then restart computer.
The checking will start automatically before next Windows startup and display the results when completed.

12. If you are not checking the system drive, then you do not have to turn off the computer. However, the selected drive may also be in use. In that case, you would receive a message to dismount the volume. Click Force a dismount.
13. The disk checking starts immediately. After it gets completed, the results will be displayed.
Upon successful completion of CHKSDK, it can be relied that the repair problems related to bad sectors, lost clusters, cross-linked files, and directory errors are now sorted out. Chkdsk can also serve as an early warning that a hard drive is deteriorating.
If Chkdsk starts finding bad sectors, then it a clear sign of a drive need replacing. In case the chkdsk fails to locate and repair the defect in the disk, then the user is highly recommended to make use of a proficient Windows Data Recovery.
Perfect solution for failed Chkdsk
Windows Data Recovery offers a perfect solution for failed chkdsk. Due to major corruption, chkdsk often fails. To counteract such situation the user is advised to use the licensed version of Windows Data Recovery. The tool restores data that is lost due to accidental or intentional formatting of hard disk partitions.
Integrated with various modes like- Quick Scan, Extensive Scan and File Trace recovery modes helps in effective recovering of data based upon various circumstances. The tool consists of Find Files option that helps to search out for a specific type of file in the recovered data. Apart from above mentioned features of the software, the software also entails other features such as recovery of data that is lost due to damage or deletion of partition structures.
Steps involved in working of Windows Data Recovery:
Windows Data Recovery effectively recovers data from the corrupt, damaged, or virus-attacked FAT16, FAT32, NTFS, and NTFS5 partitions. Using the software, the steps you need to follow to retrieve the corrupt data are:
- Mode selection: Select mode in order to perform data recovery.
- Drive Selection: Select the drive where recovery operation is to be performed.
- Selection of partition: Make appropriate selection of partition and wait for completion of the recovery process.
- Saving the retrieved data: In this step, finally save the retrieved results.
The capability and potential of Windows Data Recovery to recover deleted, damaged and formatted windows hard drive partition make it appropriate for every condition. Windows Data Recovery software saves the scanning process of corrupt hard drive. This facility helps in terms of scanning the drive again and again. The tool is also available in trial version and one could get familiar with its properties using the trial version.
![]()