
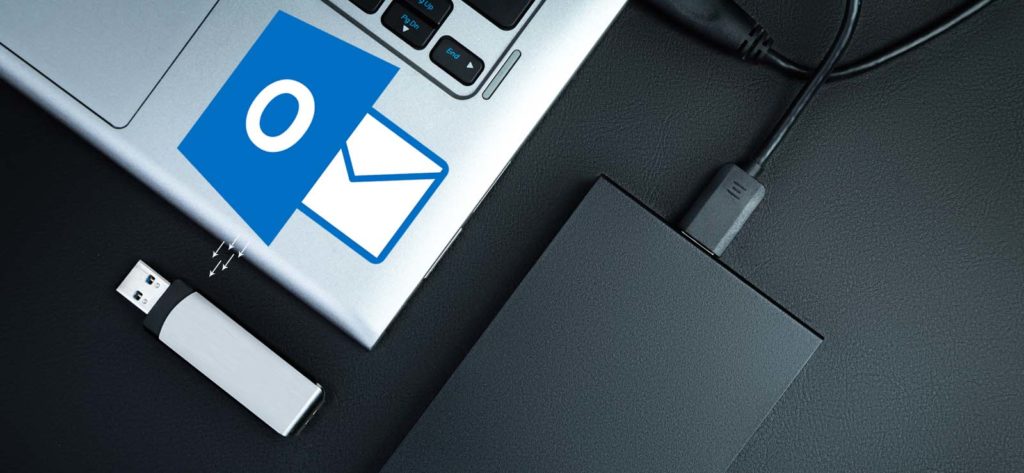
Microsoft Outlook is widely used for personal as well as professional communications through emails and as an information manager. Its popularity, stability, and features have improved a lot over the years. Common and frequently used Outlook features are very easy to remember. They also have so many methods and shortcuts that different users achieve the same output through different methods. Still, there are many features most people are not even aware of; and many others use them very occasionally but don’t remember the steps. For such operations that are occasionally used, it is better to find the complete method beforehand. It saves time and avoids mistakes, as well. One such method will be covered in this blog, saving outlook emails to a USB flash drive. Let us get started.
Benefits of Saving Email on a USB Flash Drive
There are situations when saving important data to the flash drive becomes important. So, before moving any further on this topic, we are going to discuss the importance of saving Outlook data on a flash drive. Below we are going to mention scenarios in which one may decide to export his/her emails to a flash drive. Let’s discuss some benefits of selecting this approach.
- It can serve as a backup if you face any issues with Outlook and need a complete recovery.
- Moving emails to a USB drive can help you clean up unwanted emails so as to free space on your Outlook.
- Emails on a USB drive can be viewed anytime, even without an active internet connection.
- It is always a good idea to keep backups of important items on a machine different from the current one so that if that machine is impacted, your backups are safe and can be used to get you up and to work quickly. On the same note, PST files on the same machine servers no purpose if that machine falters. A USB flash drive can be used to import your Outlook data to another machine in such a scenario.
How to Export Emails to USB Flash Drive?
After discussing the benefits of transferring Outlook data to an external drive, let’s discuss how to do it. Here we are going to mention the most trustworthy method to transfer the Outlook data to the flash drive. Follow the below-mentioned steps:
- Open the Outlook application on your Windows PC.
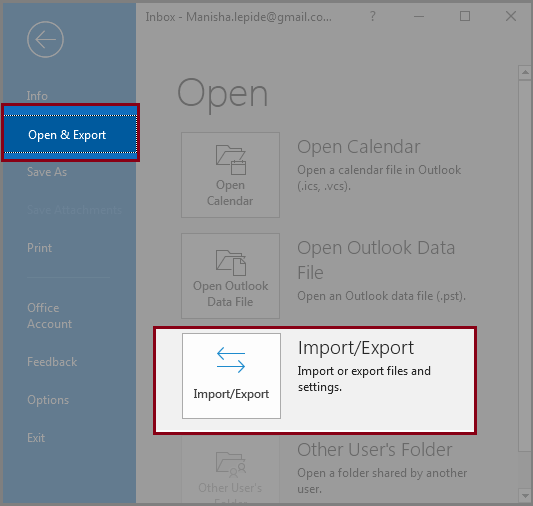
- Click on File and then on Open and Export.
- Next, click on the Open & Export option.
- This will open the Import and Export wizard in a new window.
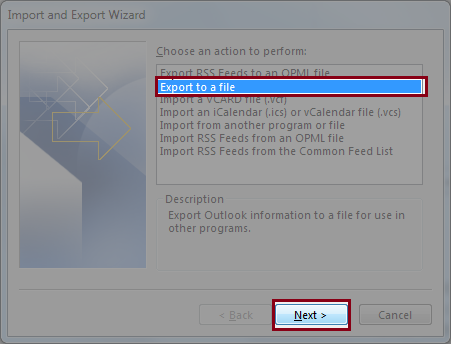
- Choose the Export to a file option from the listed actions. Click on the Next button to proceed.
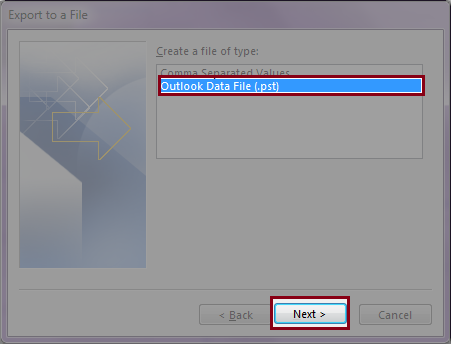
- In the next step, you will have two options to determine the type of file to export; select the option for Outlook Data file (.pst). Click on the Next button to move forward with the export process.
- Next, select all the folders that you need to export, and click on the Next button.
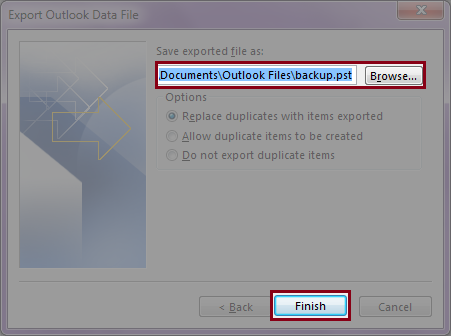
- Now click on the Browse button and select the USB flash drive location where the PST file should be saved. Click on Finish.
- It will prompt you to add a password to your PST file. You can add a password or skip it. You need to enter a password and then again confirm it to set a password on the PST file so as to make it password protected. You can skip the add password option as well.


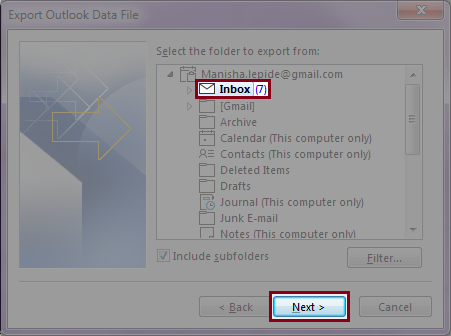
Note: You can also check the option for Include subfolders.
So, this is how you transfer all your data from Outlook to the flash drive. The steps are short and simple, and most importantly, these are the reliable ones. We suggest you follow either this method or use Outlook PST Repair for the same. As the name suggests, this tool repairs the corrupt PST files too. All you need to do is, while saving your data, select MS Outlook PST as the saving file, and while providing a destination, select a place on your drive.
View Emails from the USB Flash Drive
By now, you should have the Outlook emails and other items on your USB Flash Drive. You can use this export file to view the Outlook contents on any other machine. Just follow the simple steps as below:
- Insert the Flash Drive on the target machine.
- Open the Outlook application.
- Go to File and click on Open & Export.
- Now, click on the button Open Outlook Data File.
- It will open a new window to select the PST file. Browse to the flash drive and select the PST file created in the previous method and click on the Open button on the bottom right of the window.
- Now, you will be able to see a new folder created in your Outlook, and it will have all the contents that were exported earlier.
View Emails Using Outlook PST Viewer
Many users have reported scenarios wherein they want to view contents from their PST backup without importing it to their Outlook application. It can lead to confusion and duplicity issues if the primary folder names are the same. Further, one may want to view the contents from an old email account and hence don’t want to merge it to the new account. There can be various other reasons why one may want not to import the PST file to Outlook. Without going further into the reasons, here is the best solution for you. PST Viewer is an application specially designed to serve this purpose. It is a simple yet powerful tool that can be used to view PST file contents quickly. The contents are loaded and viewable in a structure similar to Outlook. Install the tool properly on your system and follow the below-mentioned steps:
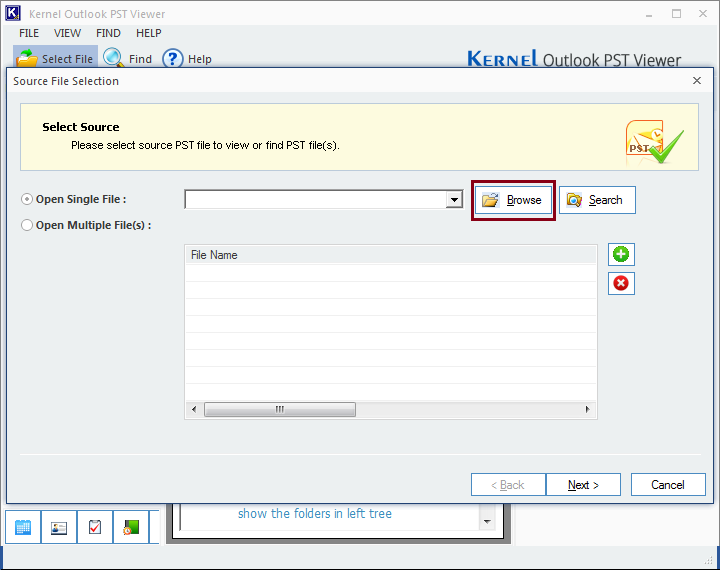
- Run the tool and click on the Browse button. By doing this, you will be asked to select a PST file that you want to open.
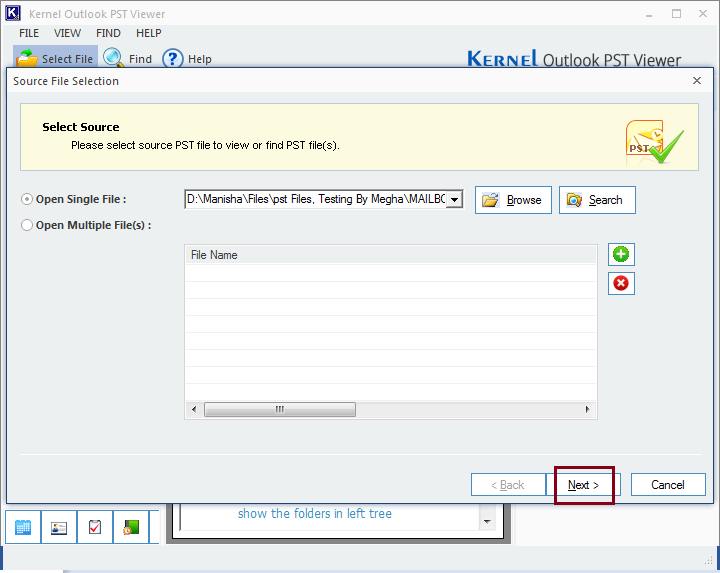
- Select the PST file and click on the Next button.
- As you move to the next step, click on the relevant file you want to preview on your screen. Have the display and enjoy.


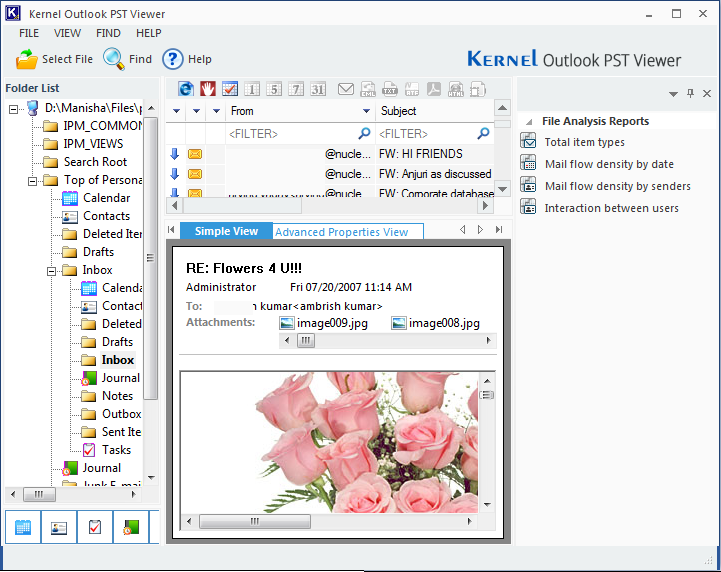
Note: You can click on the mentioned categories of File Analysis Reports to get the reports of the desired fields.
![]()

Conclusion
In this blog, we started by giving a brief overview of the Outlook application and its criticality in our day-to-day life. Then we covered some of the situations when one may want to export Outlook data to a USB flash drive. We also listed down some of the benefits of this approach. Then we covered in detail the steps to export Outlook data to flash drives. Further, we helped with the method to import and view the contents of the PST file. In the end, we provided a solution for those users who wanted to view the contents of a PST file without importing it to Outlook, PST Viewer. Well, that is all. Hope this blog helped you. Let us know how helpful this article was to you by commenting below.