
A quick guide on preparing Exchange 2010 for Exchange 2016 installation
Exchange Server 2016 introduced many advanced features and facilities to enhance the enterprise-level emailing experience. Its new-age features coupled with its integration to the cloud made it one of the most desirable email communication systems for organizations. Organizations with existing Exchange infrastructure were eager to grab the new version right from its launch. Despite the migration complexities and the costs involved, many organizations migrated to it as soon as it was rolled out.
Unfortunately, direct migration to Exchange 2016 from Exchange 2003 or 2007 is not possible. And so, Exchange 2010 happens to be the oldest version from which direct Exchange 2016 migration is possible. So, for Exchange 2010 users, it is the right time to upgrade their Exchange infrastructure to the newest version.
Instant Solution - Exchange Migrator
Exchange/Office 365 migrations are quite easy with professional tools like Exchange Migrator. This tool helps to manage mailbox and public folder migrations involving different Exchange versions and deployment types. Also, this tool helps with all tasks starting from the pre-migration analysis to the preparation of reports after the migration.
How to perform Exchange 2010 to Exchange 2016 upgrade?
Our aim here is to help small organizations to upgrade their Exchange infrastructure from Exchange 2010 to Exchange 2016 without any hassles. We discuss this upgrade in the context of a small organization where a simple installation is fine. In this series, we will discuss the following steps of migration briefly:
- Exchange 2010 to Exchange 2016 Migration – Part 1
Helps you prepare your Exchange 2010 environment for Exchange 2016 upgrade - Exchange 2010 to Exchange 2016 Migration – Part 2
Describes Exchange 2016 installation in Exchange 2010 environment - Exchange 2010 to Exchange 2016 Migration – Part 3
Guides you in creating your first Exchange 2016 mailbox and in assigning permissions - Exchange 2010 to Exchange 2016 Migration – Part 4
Explains configuring Exchange 2016 internal/external URLs - Exchange 2010 to Exchange 2016 Migration – Part 5
Migration of system mailboxes from Exchange 2010 to Exchange 2016 - Exchange 2010 to Exchange 2016 Migration – Part 6
Tips for configuring SCP and DNS Records - Exchange 2010 to Exchange 2016 Migration – Part 7
Procedure for the migration of mailboxes from Exchange 2010 to Exchange 2016
How to start with Exchange 2016 installation
Before installing Exchange 2016, you need to make sure that your environment has all the hardware and software pre-requisites for Exchange 2016 installation. Also, you need to configure Offline Address Book in Exchange 2010 and modify the AD schema as per Exchange 2016 requirements. All these steps ensure that Exchange 2016 works to its full potential. Here, we will discuss all these requirements.
Installation pre-requisites
For smooth Exchange deployment, check and verify that you have all the necessary pre-requisites related to hardware, OS, software, and email clients. Here, we will discuss these requirements in brief. For more info, you can read Exchange 2016 release notes at https://docs.microsoft.com/en-us/Exchange/release-notes?view=exchserver-2016
Domain Controllers
All the Domain Controllers in the forest must be running on one of the following:
|
Domain Controllers Forest
|
|
| Active Directory Forest | Should be at Windows Server 2008 or higher functionality level |
| Supported DNS Name Space | Contiguous, Noncontiguous, Single label domains, or Disjoint |
| IPv6 Support | Supports only with IPv4 |
| Recommendations |
|
| Hardware Requirements | |
|---|---|
| Processor |
|
| Memory | Depends on the server role to be installed (8 GB for Mailbox and 4 GB for Edge Transport) |
| Disk space | 30 GB to install Exchange, an additional 500 MB to install UM language pack, 200 MB on the system drive, and 500 MB for the hard disk that stores the message queue database |
| OS Requirements | |
| For Mailbox & Edge Transport Server Roles | Windows Server 2016 (CU3 or later)/2012 R2/2012 Standard or Datacenter |
| For management tools | Windows Server 2016/2012 R2/2012 Standard or Datacenter or Windows 10/8.1 (64 bit) |
| Windows Management Framework | Only the built-in framework supported (downloaded frameworks are not supported) |
|
Recommendations
|
|
Exchange 2010 co-existence requirements
- Exchange Server 2010 Service Pack 3 (SP3) installed with Update Rollup 11
Email clients (recommended to use with the latest updates & service packs)
- Outlook 2016/2013/2010
- Outlook for Mac 2011
- Outlook for Mac for Office 365
Installation permissions (Exchange 2016)
- To install the Exchange 2016 Mailbox Server role, you should have Local Administrator, Enterprise Administrator, or Schema Administrator permissions.
- To install additional Mailbox servers, you need Organization Management permissions
Management permissions (Exchange 2016)
To perform migration-related actions, you need to have enough permissions for the account you are using:
- To configure disjoint namespace, you need Local/Domain Administrator permissions
- And with Organization Management permission, you can configure disjoint namespace, mail flow, accepted domains, email address policies, external URLs, certificates, and Unified Messaging. Also, you can migrate mailboxes and public folders using this permission
So, with these permissions, you can complete the entire Exchange Server deployment, configuration, and migration quite successfully.
So, with these permissions, you can complete the entire Exchange Server deployment, configuration, and migration quite successfully.
How to get Organization Management permissions?
We have discussed the steps for this in the coming parts of this series.
Configure default OAB in Exchange 2010
This is an important step, and the failure to configure the default OAB will lead to a significant loss of migration speed. If you don’t assign default OAB, the mailboxes will start downloading and using Exchange 2016 OAB, causing the migration process to slow down.
This can be done using Exchange Management Shell as:
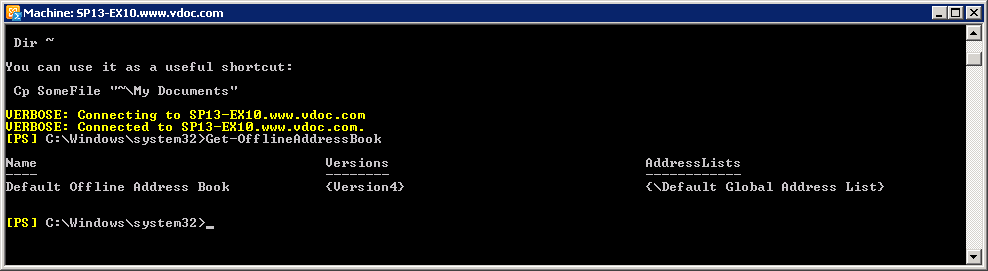
- In the Exchange Management Shell, run:
Get-OfflineAddressBookIt retrieves a list of Offline Address Books
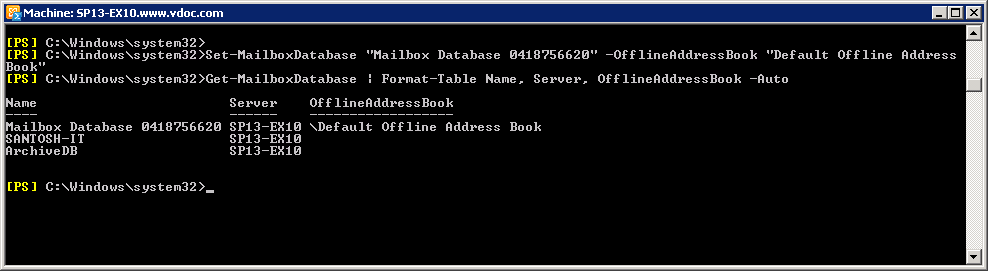
- To view the mailbox databases and respective OABs, run:
Get-MailboxDatabase | Format-Table Name, Server, OfflineAddressBook -Auto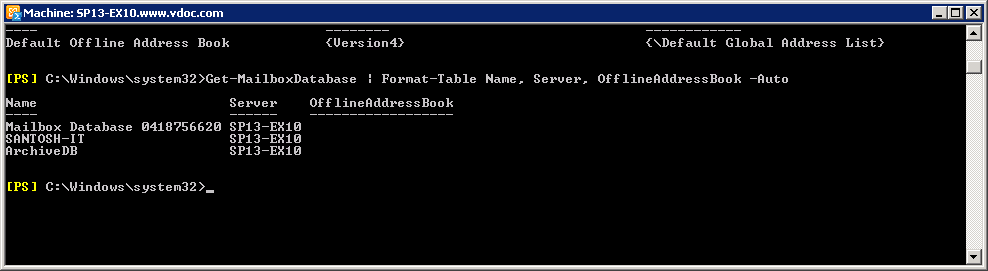
- To set OAB to a mailbox database, run :
Set-MailboxDatabase "" -OfflineAddressBook ""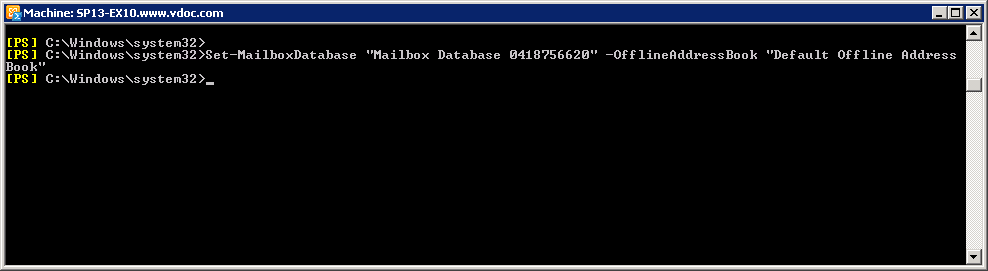
- You can verify this by running the command again:
Get-MailboxDatabase | Format-Table Name, Server, OfflineAddressBook -Auto

Why do we choose to use Exchange 2016 Setup Wizard?
As mentioned in the beginning, we are discussing this upgrade in the context of a small organization. Also, we avoid discussing multiple domain controllers and Database Availability Groups (both on the source and target environments). Even in this simple scenario, preparation of AD forest and domains are necessary before Exchange installation (and the .ldf files that describe the AD schema changes are available in the directory \Setup\Data\ of the Exchange installation files).
And the required AD schema changes can easily be achieved with the help of Exchange 2016 Installation Wizard. This is the easiest for Exchange installation in small AD environments with a single management team for both AD and Exchange.
After meeting all these necessary hardware and software requirements described in this part, you can continue to install Exchange 2016. For this, read the second part of this series.
Summary
Before installing Exchange 2016 in your Exchange 2010 environment, make sure that you meet all the necessary pre-requisites. Also, it is advised that you configure Offline Address Book in Exchange 2010. After that, you can use Exchange 2016 Setup Wizard to install Exchange 2016.


It is good if you know the time required for Exchange migration in advance. Professional Exchange Migration tools like this helps you in calculating this. Its Pre-Migration Analyzer calculates the approximate time for the migration from the network speed and the number of agents (network computers used for the migration). Prior knowledge of the migration time will help you plan the resources and schedule the migration accordingly.