
This is the third part of a series of blogs covering how to migrate from Exchange 2013 to 2016. In part two, we went through the process of installing the correct SSL certificate in Exchange Server 2016 and migrating the CAS role from Exchange Server 2013 to Exchange 2016.
To read other parts in this series, go to:
Exchange 2013 to Exchange 2016 Migration (Part 1)
Exchange 2013 to Exchange 2016 Migration (Part 2)
Exchange 2013 to Exchange 2016 Migration (Part 4)
Exchange 2013 to Exchange 2016 Migration (Part 5)
Exchange 2013 to Exchange 2016 Migration (Part 6)
Exchange 2013 to Exchange 2016 Migration (Part 7)
Instant Solution - Exchange Migrator
Exchange/Office 365 migrations are quite easy with professional tools like Exchange Migrator. This tool helps to manage mailbox and public folder migrations involving different Exchange versions and deployment types. Also, this tool helps with all tasks starting from the pre-migration analysis to the preparation of reports after the migration.
In this part, we will cover how to configure virtual directories and outlook anywhere settings on the new server. We will then change the ‘A’ records to migrate clients to the CAS service on Exchange 2016.
Setting virtual directories on Exchange 2016
Now that the service connection point has been configured (when Exchange Server 2016 was installed), a number of other services have to also be configured in order for Exchange to provide the right URLs and hostnames to clients during the autodiscover response.
The following services have to be configured:
- Outlook Anywhere
- Exchange Control Panel URLs
- Outlook Web Access URLs
- Exchange Web Services URLs
- ActiveSync URLs
- Offline Address Book URLs
- MAPI Virtual Directory
In our case, we will configure our Exchange Server 2016 to use the same FQDN as Exchange 2013 before we change the DNS records.
1. Setting Outlook Anywhere
Outlook anywhere settings specify what addresses Outlook will connect to. To set the hostnames used for Outlook Anywhere, the following command should be run.


2. Setting Exchange Control Panel URLs
Run the following command to configure Exchange Control Panel URLs.


3. Setting Outlook Web Access URLs
Run the following command to configure Outlook Web Access URLs.


4. Setting Exchange Web Services URLs
Run the following command to configure Exchange Web Services URLs.


5. Setting ActiveSync URLs
Run the following command to configure ActiveSync URLs.


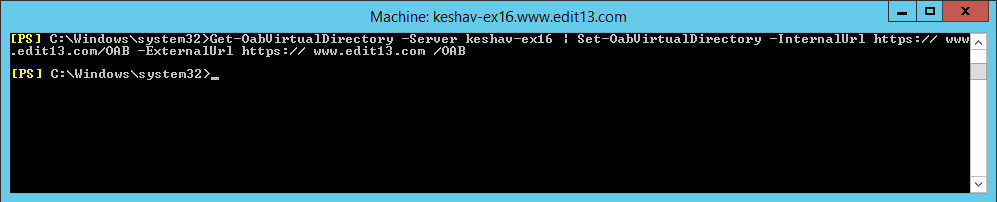
6. Setting Offline Address Book URLs
Run the following command to configure Offline Address Book URLs.

7. Set MAPI Virtual Directory
Run the following command to configure MAPI Virtual Directories settings. This step can be avoided if you are not using MAPI over HTTP.
Recycling the MSExchangeAutodiscoverAppPool
The autodiscover service has to be compelled to use the new URLs. For that, recycle the MSExchangeAutodiscoverAppPool app pool. You can do this without switching off the server.


Configuring a firewall NAT rule
The new Exchange 2016 server should have a new static public IP for establishing external client connections. To do that, open port 443 (which is the standard TCP port for SSL connections) to the server and assign a static one-to-one NAT rule.
Testing CAS server migration
In the old Exchange Server 2013, a particular A record was used for establishing client connections, and another one was used by external clients to retrieve autodiscover settings. After the new Exchange Server’s virtual directories settings and Outlook Anywhere configurations have been done, the clients can be migrated to the new server.
In order to this, add an A record in the host file to redirect them to the new server (Exchange 2016) instead of the old server. To configure this setting: Open the host file using notepad (located by default in “C:\Windows\system32\drivers\etc\hosts” folder) and, as an administrator, add new lines to point the A records to the new Exchange Server’s IP.
11.2.0.32 <FQDN for establishing client connections>
11.2.0.32 <FQDN used by external clients to retrieve autodiscover settings>
After doing the above, make sure that the clients can connect to the new Exchange Server. Be sure to also test that the shared calendars, mailboxes, public folders are accessible, and you can also send/receive emails and download the offline address book.
After you have done these tests, update the host file to resolve the A records to the public IP of the Exchange Server. Ensure that clients on an external network can also connect to the server. After the testing has been done, delete the entries from the host’s file.
Migrating CAS server
After the testing, change the internal ‘A’ records for the FQDNs to resolve to the internal IP of the Exchange Server 2016.

Once completed, log into your public DNS provider and change the public ‘A’ records for the FQDNs to resolve to the public IP of the Exchange Server 2016.

Conclusion
This part of the series covers configuring virtual directories on the Exchange Server 2016 as well as migrating Client Access Server roles from Exchange Server 2013 to Exchange 2016. In part 4 of the series, the process of migrating mailboxes and public folders to Exchange Server 2016 will be discussed.
FAQs
Q. What is Outlook Anywhere?
A. Outlook Anywhere is used by MS Outlook for the remote connection. It helps the users to access Outlook without any hurdle and works as an alternative VPN connection.
Q. Should I enable all the above-mentioned facilities in the same order as you did?
A. No, you can enable these facilities as per your order, but the command should be run properly.
Q. Can I check the connection between Exchange Servers using Exchange Migrator software?
A. The software tries to add the mailbox only after checking the availability of the on-premises Exchange Server.
Q. Is there Exchange virtual directories in Exchange Online also?
A. No, such directories are used in the on-premises Exchange Server only. It creates a safe environment for email communication.
Q. While using the software, should I migrate virtual directories also?
A. The software does not migrate the directories but mailbox and their permissions. You should enable these directories by the above-mentioned commands.