IMAP to Office 365 is a simple tool that facilitates migrations from various IMAP email servers to Office 365 and Exchange Server (on-premises & hosted). It migrates single or multiple mailboxes from IMAP email servers to Exchange Server (on-premises/hosted) or Office 365. The migration can be performed within a few steps without any issues.
Using IMAP to Office 365, you can perform the following migrations:
- From web-based email servers (IMAP enabled) like Gmail, Yahoo, AOL, etc. to Exchange Server (hosted & on-premises)/Office 365 migration
- IMAP Office 365 to Exchange server (hosted & on-premises)/Office 365 migration
- IMAP Exchange server (hosted & on-premises) to Exchange server (hosted & on-premises)/Office 365 migration.
- From Novell GroupWise & IBM Domino/Louts Notes (IMAP) to Exchange Server (hosted & on-premises)/Office 365 migration
IMAP to Office 365 software provides two modes for the migration of mailboxes:
The IMAP to Office 365 helps you migrate a single mailbox from the source IMAP email server to a destination server (Exchange Server/Office 365). Follow the steps as:
Launch the IMAP to Office 365 application. The welcome screen of the software appears. To add the source (IMAP server), click the Add button.

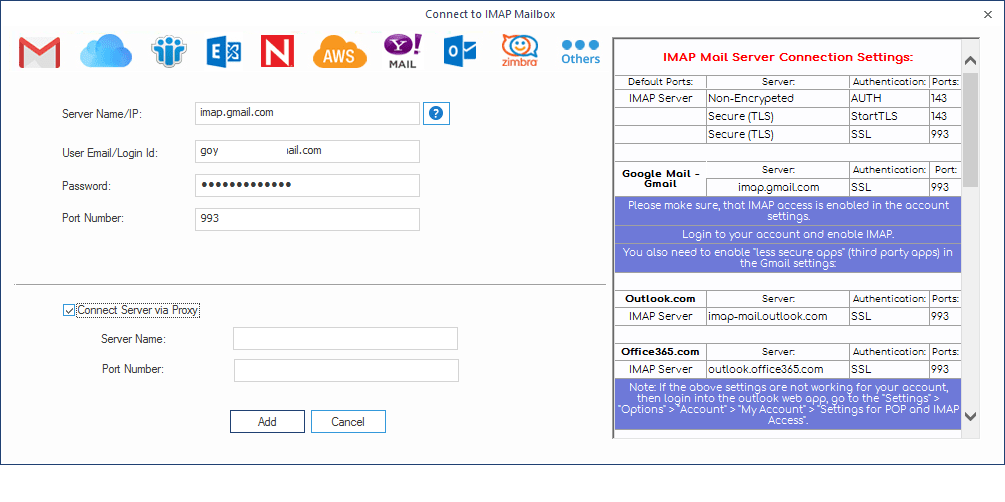
In the Connect to IMAP Mailbox page, provide the source server credentials (you can get Server name details for different email servers from the list on the right side).
- To add IMAP enabled Gmail account, enter the server name as imap.gmail.com (refer to the list on the right). Now provide the login details of the account. Then click Add.
- To add AOL account, use the server name as imap.aol.com (refer to the list on the right). Enter the login credentials and click Add.
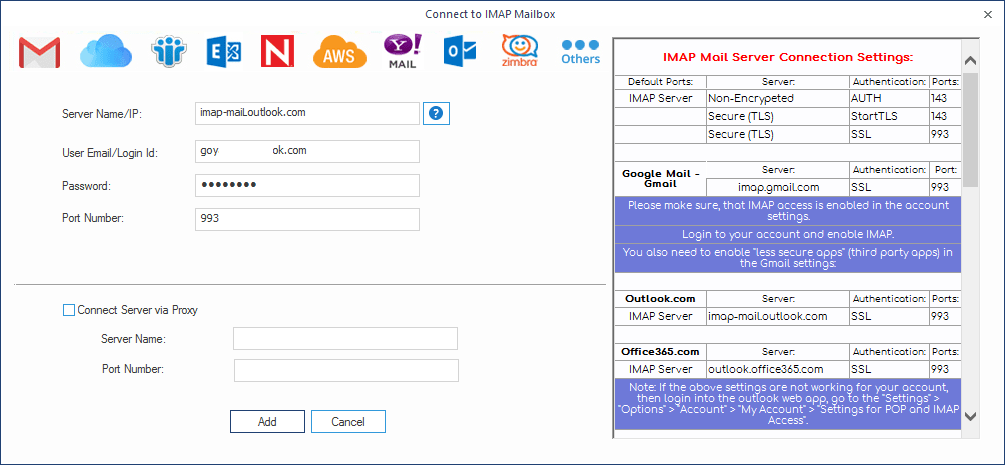
- To add Outlook.com account, enter server name as imap-maiL.outlook.com (refer to the list on the right). Enter the login details and finally click Add.
- To add Yahoo account, enter the server as imap-maiL.yahoo.com (refer to the list on the right). Enter the login details for the account and click Add.
- Likewise, you can add other accounts like Office 365, Exchange, AWS, Lotus Notes, GroupWise, etc. as the source by providing the User ID and Password details (for server names, refer to the list on the right).
Similarly, you can add different IMAP email accounts.


Here, we are going to continue single mailbox migration with IMAP enabled Gmail account as the Source. After entering all required details, click the Add button. This account will get added as the Source.
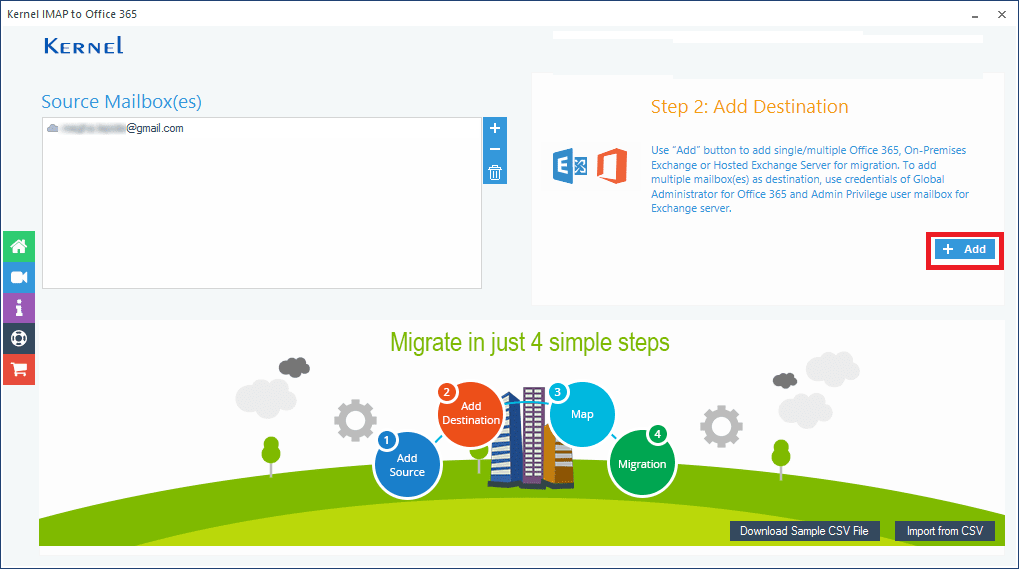
To add the destination (Exchange Server/Office 365), click the Add button under Add Destination.
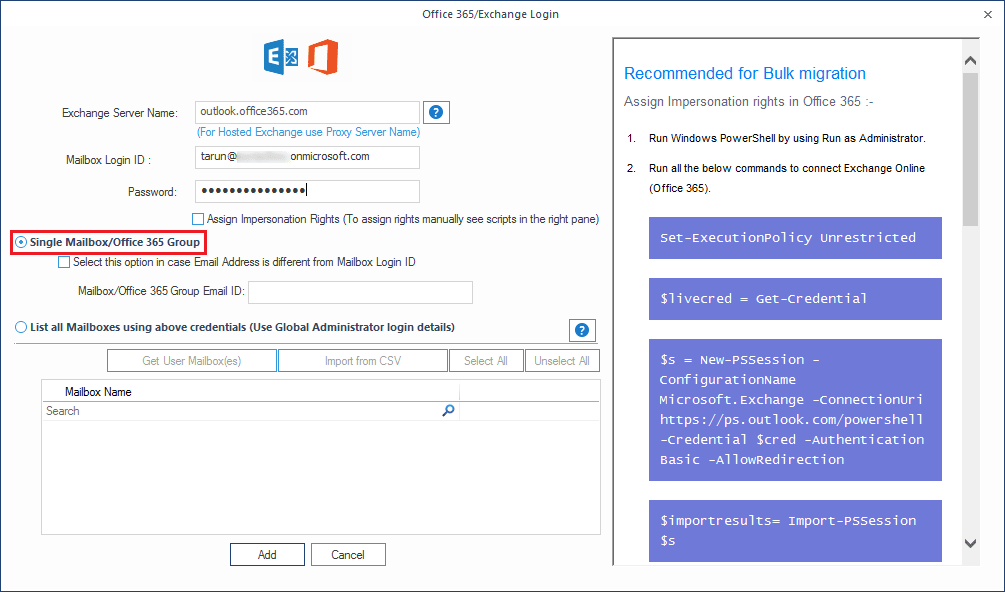
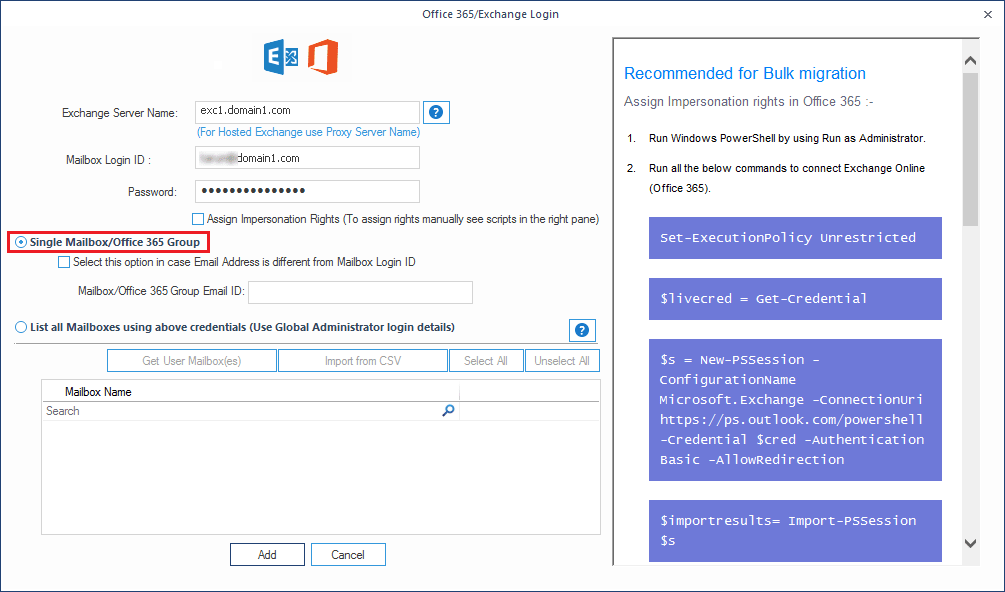
In the Office 365/Exchange Login page, provide the destination (Exchange Server/Office 365) credentials:
To add Office 365 as the destination, enter:
- Server name (outlook.office365.com)
- User Email/Login id (username@domain.onmicrosoft.com)
- Password
To add Exchange Server (on-premises) as the destination, enter:
- Server name (without domain name)
- User Email/Login id (username@domain name format)
- Password
To add Exchange Server (hosted) as destination, enter:
- Proxy server name
- User Email/Login id (username@domain name format)
- Password

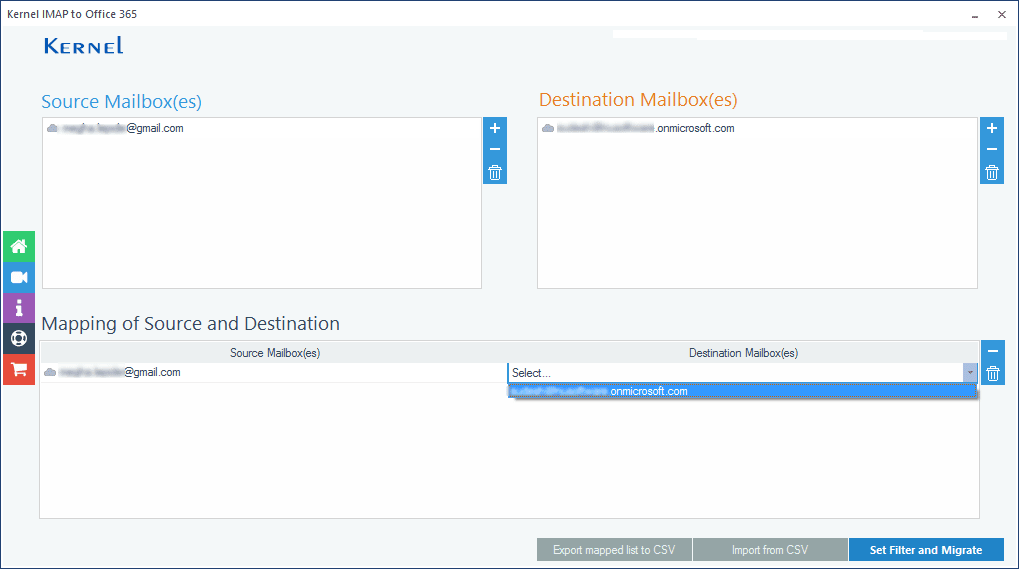
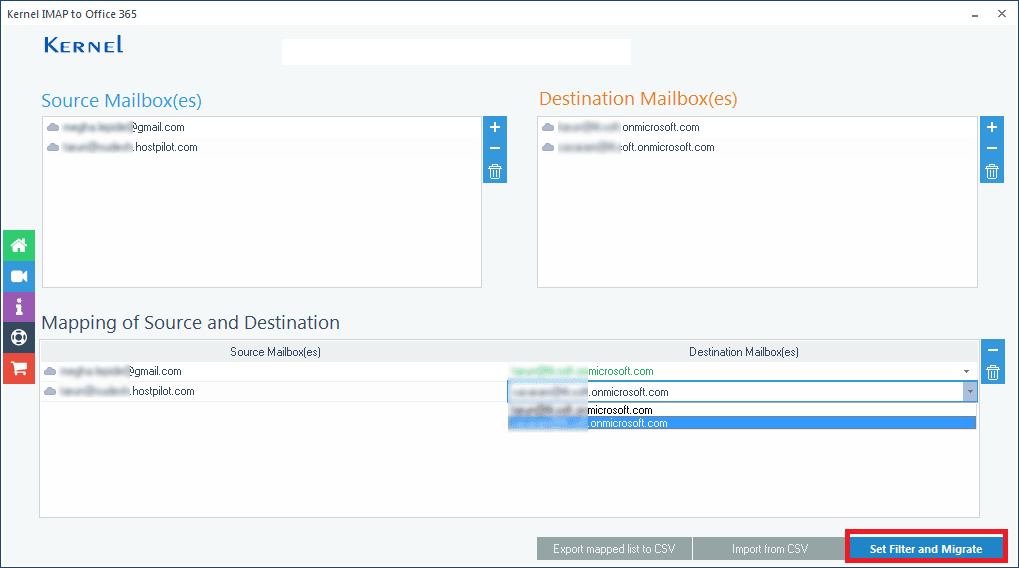
Now the source and destination mailboxes are successfully added. Under Mapping of Source and Destination, select the required destination mailbox (from the drop-down menu) against each source mailbox.
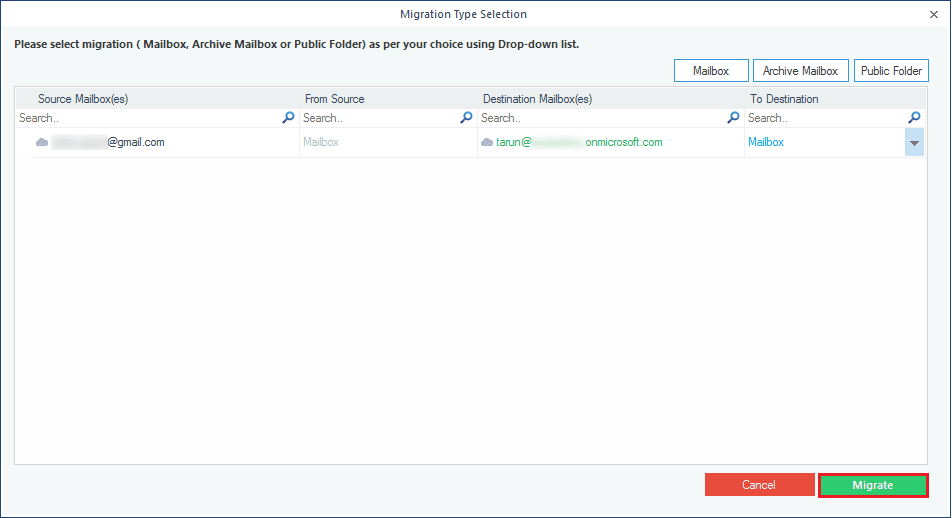
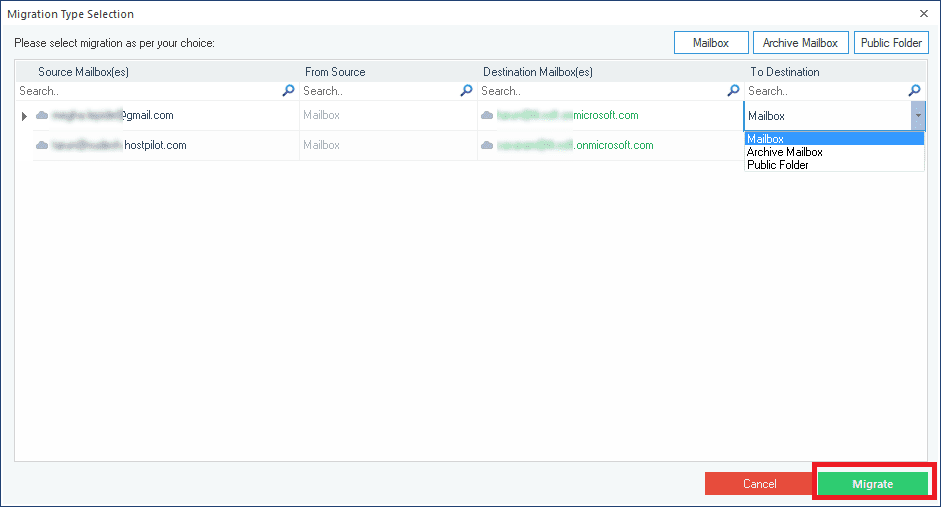
Now choose the required option— mailbox, archive mailbox, or public folder— in the destination. Click Migrate. There are three special buttons for same options for mailbox, archive mailbox, and public folder. When you use any of these buttons, then it applies to the all destination accounts.
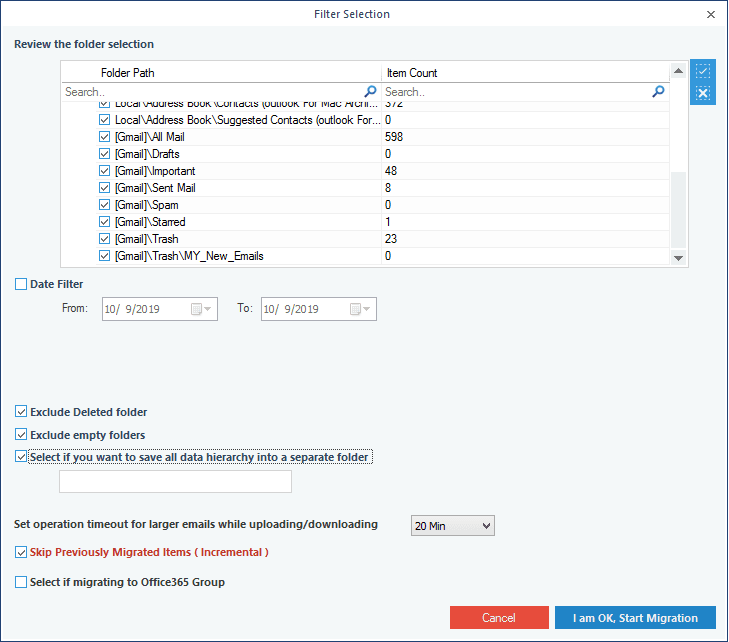
In the Filter Selection window, you can provide the required filtering:
- Review the folder selection – To select the folders for migration.
- Date Filter – Enter the From date and To date.
- Exclude Deleted folder – Select if you want to exclude ‘Deleted item folder’ from migration
- Exclude empty folders - Select if you want to exclude empty folders from the migration.
- Select if you want to save - Provide a folder name (to save the data with hierarchy inside a mailbox folder)
- Set operation timeout - Select an upper time limit for migration (the migration will be rejected if it exceeds this time limit).
- Skip already migrated – Select this option if you want to avoid migrating the already migrated items i.e. to migrate only the incremented mailbox data.
In the end, click I am OK, Start Migration.

After the completion of the migration, the software displays a confirmation message. Click OK.
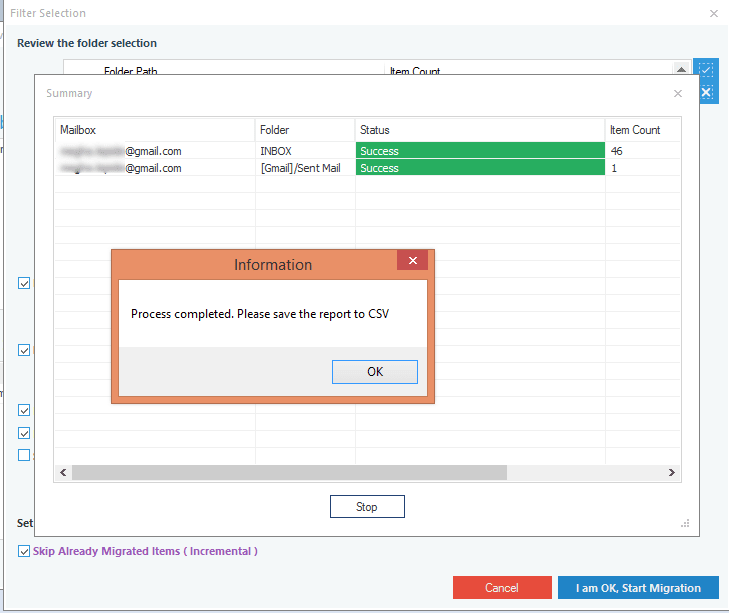
After successful migration, a CSV report is generated and displayed.
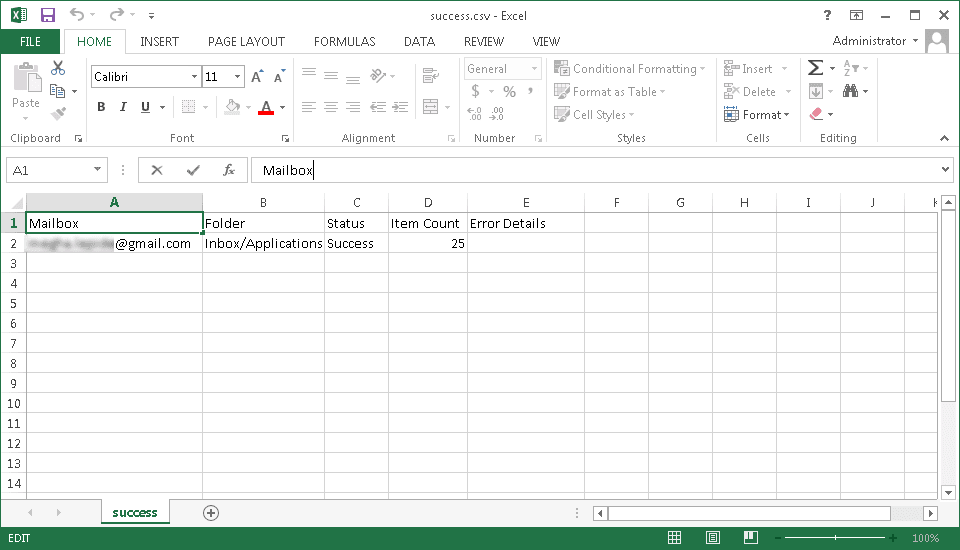
Hence, a single mailbox is successfully migrated from the Source (IMAP enabled Gmail account) to the destination (Office 365).
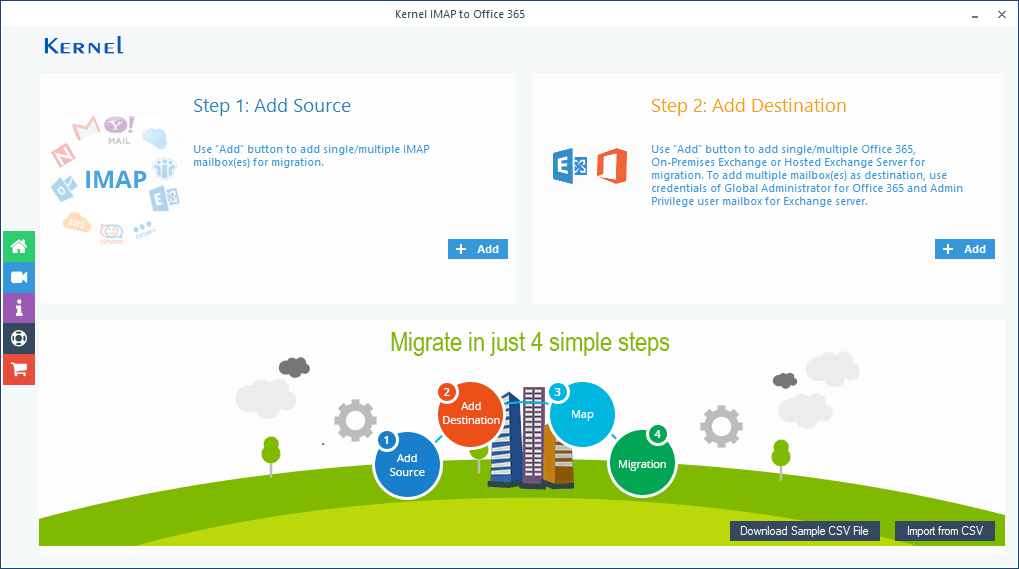
With IMAP to Office 365 tool, you can migrate multiple mailboxes from IMAP server to Exchange Server (on-premises/hosted) or Office 365. For this, you just need to use an account with administrative privileges over all the destination mailboxes. And you can do multiple mailbox migration both manually and using a CSV file. To do it manually, you can follow a procedure similar to that of single mailbox migration. To migrate multiple mailboxes using a CSV file, just follow the given steps –
Launch the software and click Download Sample CSV File. A sample CSV file will be downloaded to your system.
The login page for Source (Amazon WorkMail) is opened. Provide the login details (User ID & password) along with Origin Domain Name. You can choose the domain name according to your region where your mailbox is located.
For us-east-1 - smtp.mail.us-east-1.awsapps.com
For eu-west-1 - smtp.mail.eu-west-1.awsapps.com
For us-west-2 - smtp.mail.us-west-2.awsapps.com
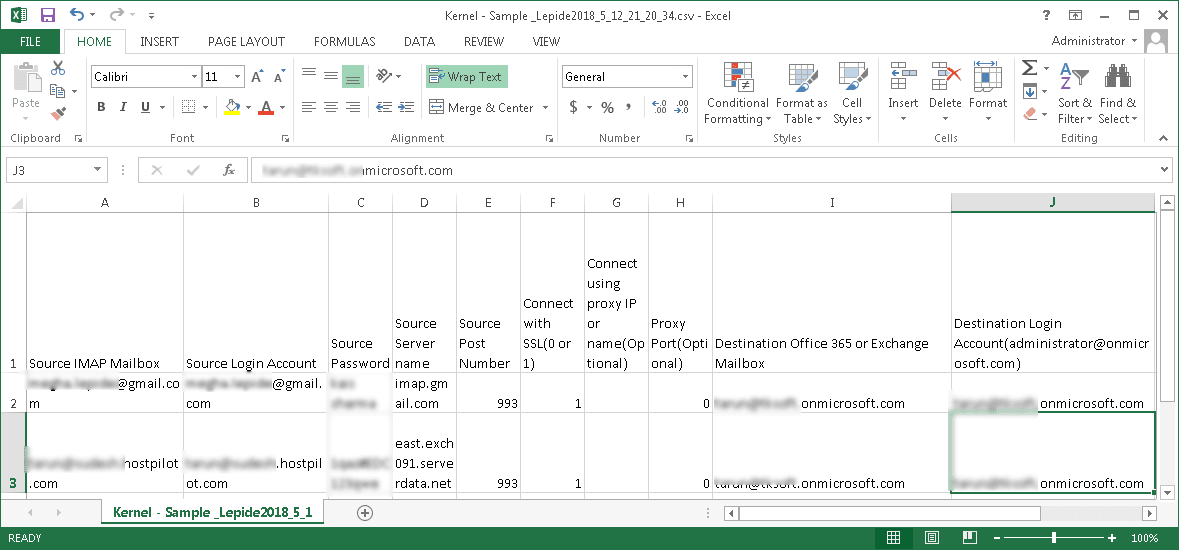
In the sample CSV file, input the required details for both the source and the destination. Save this CSV file to a convenient location.
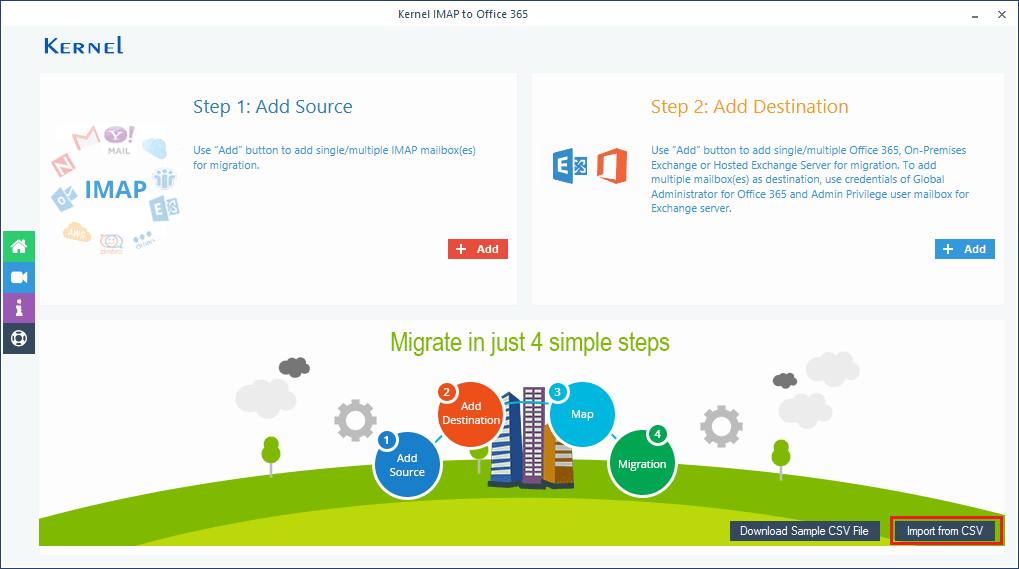
Now click Import from CSV and load this CSV file to the tool.
Both the source and destination are added. Now you can map the source mailboxes to the destination mailboxes, under Mapping of Source and Destination. To map, select the required destination mailbox against each source mailbox. Finally, click Set Filter and Migrate.
Next choose the required option—mailbox, archive mailbox, or public folder—in the destination. After selecting the desired option, click the Migrate button.
In the Filter Selection window, you can provide the required filtering:
- Review the folder selection – To select the folders for migration.
- Date Filter – Enter the From date and To date.
- Exclude Deleted folder – Select if you want to exclude ‘Deleted item folder’ from migration
- Exclude empty folders - Select if you want to exclude empty folders from the migration.
- Select if you want to save - Provide a folder name (to save the data with hierarchy inside a mailbox folder)
- Set operation timeout - Select an upper time limit for migration (the migration will be rejected if it exceeds this time limit).
- Skip already migrated – Select this option if you want to avoid migrating the already migrated items i.e. to migrate only the incremented mailbox data.
In the end, click I am OK, Start Migration
After the completion of the migration, the software displays a confirmation message. Click OK.
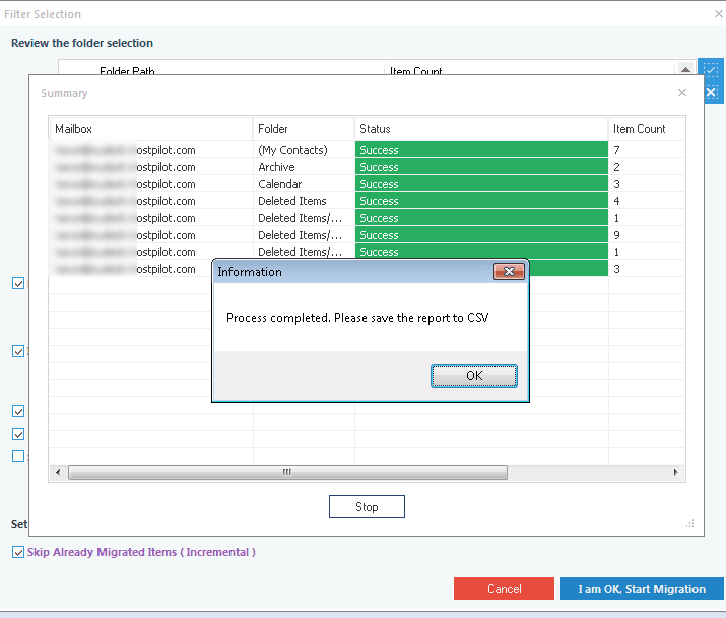
Click Save report to CSV option and to save the report.

Hence, multiple mailboxes are successfully migrated from the source IMAP Server mailboxes to Office/Exchange mailboxes.